Working with Objects
Windows, doors, and openings have similar behavior in the program, so the term “object” will be used for all these objects except we need to describe the difference between them.
To add an object, drag it from the Palette to your project.
When you bring an object over the 2D layout, it snaps to walls and changes its orientation according to the orientation of the closest wall. If this does not happen, check that snapping is turned on in the 2D View section of the program Settings.
To remove an opening, bring up its contextual menu and tap Delete.
To select an opening, tap on it. Also, you can select them in the Project Tree.
To move an opening, drag it to a new place.
When you move an object, it rotates automatically and glues onto the nearest wall.
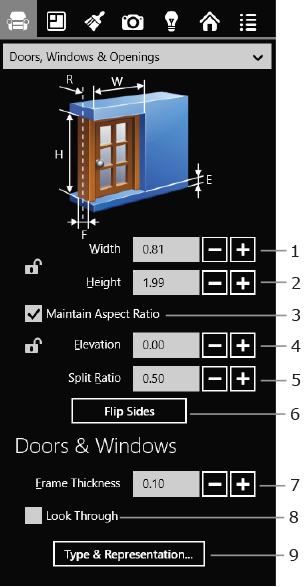
Parameters of openings can be reviewed and modified in the Inspector.
1 and 2 – The width and height of the object with an option to lock them.
3 – Maintain the aspect ratio when the object is resized.
4 – The elevation of the object. You can lock it to only move the object horizontally.
5 – Set the position of the object in relation to the wall (e.g. how deep a door is in the doorway).
6 – Turn the object 180 degrees horizontally.
7 – Adjust the thickness of the frame to the wall thickness.
8 – The Look Through option lets you control transparent parts of windows and doors. Normally, you can see the 3D scene behind a door or window. By turning this off, you can slightly increase the speed of 3D scene rendering. When Look Through is deactivated, objects behind the door or window won't be displayed.
9 – Open the Type & Representation dialog. If an object was imported, change its type to either Window or Door in this dialog.
To replace a material, drag a new one from the Palette and drop it onto the object in the 3D View. See the Applying Materials to Objects section for more details.
To differentiate objects on the floor plan based on the materials used or other criteria, apply different stroke colors and pattern fills to them. These parameters can be changed in the 2D Properties tab of the Inspector.