Live Interior 3D Interface
To display the program settings, swipe from the right edge of the screen, and select Settings. Alternatively, tap on the File button in the app bar and choose Settings.
The 2D View and Preferences sections contain the app settings. The Project section lets you set up the current project.
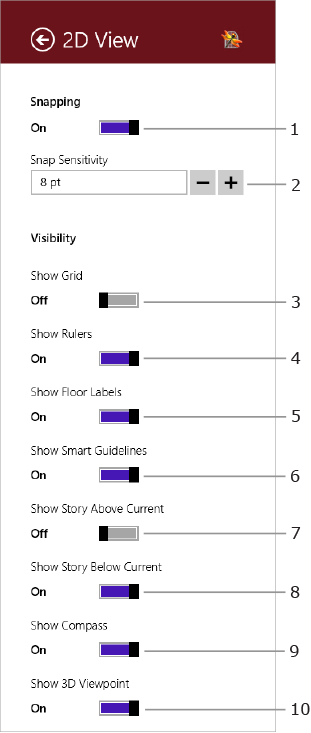
This section lets you set up the 2D view.
1 – Activate or deactivate snapping. This option concerns the behavior of drawing tools and objects when you move or resize them. When enabled, objects will snap to one another when in close proximity.
2 – Snap Sensitivity defines how close the selected object needs to be to another before the objects snap together.
3 – Show or hide the grid. The program changes this setting automatically depending on the zoom percentage of the 2D view.
4 – Show or hide rulers.
5 – Show or hide floor labels.
6 – Activate or deactivate smart guidelines and snapping to them. These guidelines show up temporarily when you move a tool or object near another object in order to help you align them correctly.
7 – Show or hide walls of the story above the current one.
8 – Show or hide walls of the story below the current one.
9 – Show or hide the compass.
10 – Show or hide the viewpoint. When it is on, the viewpoint is usually displayed as a blue triangle on the floor plan.
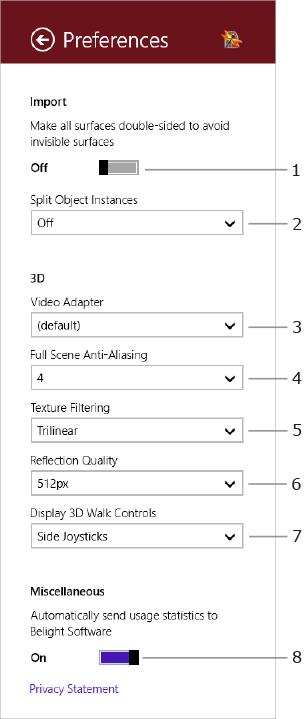
1 – This option fixes objects with surfaces created inside out. Without repair, such defective objects appear as having holes or missing parts in the 3D view. Only those objects are affected that were imported when this option is on. Not all objects can be fixed this way.
2 – The Split Object Instances option separates parts of an object you import. As a result you get an object that can be ungrouped in the 2D view. Not all objects can be split this way.
3 – Select your video adapter type. There are usually two or three options in the list. Your computer can have one or two video adapters. The list also includes the "Microsoft Basic Render Driver" item which provides software rendering. It is slower than a hardware accelerated video adapter, so use this option only if the other don't work. In case of two video adapters, one, as a rule, provides better performance while another consumes less energy. For comfortable work, choose the more powerful one.
4 – Full Scene Anti-Aliasing makes the picture look softer by smoothing the edges of objects. When this option is off, diagonal lines may look jugged.
5 – Texture filtration softens textures that are farther away from the camera.
Filter off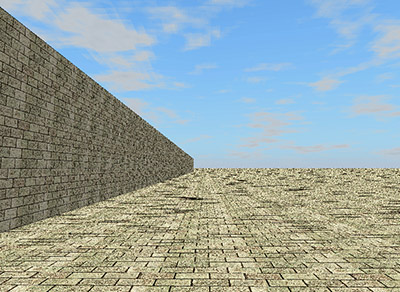 |
Filter on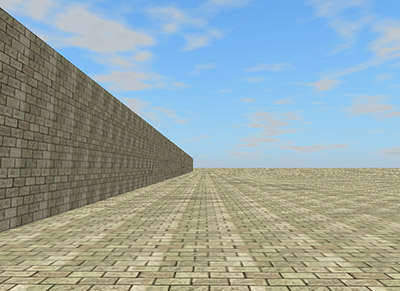 |
6 – Reflection quality defines how detailed reflected pictures are. The higher the quality, the more realistic reflections will look. Also, the higher the quality, the longer the render time.
7 – Walk Control type. Joysticks are more useful if you prefer touchscreen gestures. The central Walk Control is easier to use with the mouse. For more details, read Walk Controls.
8 – Automatically send usage details to the developer.
Note that in the 3D section, settings located at the end of the drop-down lists (except for the Walk Control type) offer better rendering quality but require higher device performance.