
Using Cameras
To add a camera, select the User Camera tool in the 2D toolbar. Tap the place on your 2D floor plan where a new camera should be placed. Touching the screen, move your finger slightly away from the camera. Moving the finger in a circle, rotate the camera until it is pointed in the right direction. Then take your finger off the screen.
To remove a camera, bring up its contextual menu and tap Delete. You can only delete user cameras.
To add a movie camera, select the Movie Track tool in the 2D toolbar. Then tap where a new camera should be placed. You should add at least two movie cameras in order to create the beginning and end of a movie track. Since each movie camera is a part of some movie track, you can delete a movie track to remove all of its cameras. More detailed information on how to move and rotate movie cameras is given in the Creating Movies section.

To delete an individual movie camera or a movie track, open its contextual menu and choose the Delete command.
All user cameras and movie cameras are listed in the Cameras tab of the Inspector and in the Auxiliary section of the Project Tree.
On the floor plan, each camera has two handles. The handle in the middle is used to move cameras without changing the orientation. To rotate a camera, drag its handle on the side of the selection frame.

If you select a user camera and walk in the 3D view, the camera will move or rotate along with your current view. There are two ways to prevent the camera from changing its location in this situation. The obvious method is to lock the camera in the Project Tree. Or deselect it by tapping on free space or anything but the camera in the 2D view.
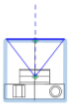
A blue triangle with a dashed line indicates the current direction of the camera. The point at which the camera stands is located at the corner of the triangle where the dashed line begins. You can hide or show the described viewpoint symbol using the Show 3D Viewpoint control in the 2D View section of the program settings.
The active user camera is the camera whose point of view is used in the 3D view. This camera always coincides with the viewpoint symbol. Any movie camera can also be selected as the point of view.
To activate a user camera, select it in the 2D view, Cameras tab of the Inspector, or in the Project Tree. In the Cameras tab, you can also select one of predefined cameras.
The Cameras tab of the Inspector lists all cameras including predefined ones that aren't present in the Project Tree and 2D view. This list is useful to select cameras and instantly preview your project in the 3D view.
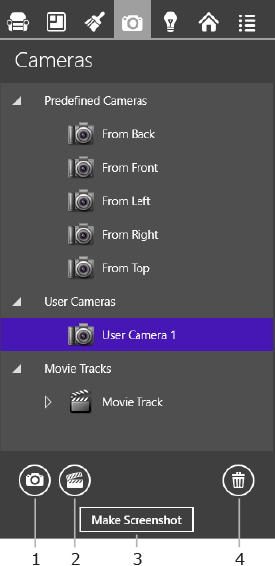
1 – Add a new user camera. The view point will coincide with the current view in the 3D view window.
2 – Add a new movie track with a movie camera defining the beginning of the track. The following taps on this button will add more movie cameras to the current movie track.
3 – The Make Screenshot saves the current 3D view as a graphic file. This function is identical to the Export > Make Screenshot command in the app bar.
When a movie camera or track is selected, the button has an alternative function: Record Movie. The Loop Track check box below the movie track list lets you connect the beginning and end of your movie track.
4 – Delete a camera or movie track.