Working with Projects
You can create a movie as you walk through your 3D space.
Movie creation begins with adding a movie track that is a path along which an imaginary video camera moves. You can place multiple movie tracks in your project. A movie track can be edited at any time. To create a movie, select a movie track and start the process by tapping the Record Movie button in the Cameras tab of the Inspector.
A movie track is made up of one or several straight or curved segments. The track runs over anchor points – movie cameras. End points of the movie track are also movie cameras. When you create a movie track, you place movie cameras in some key points in the 3D space. Intermediate points will be interpolated automatically according to a Bézier curve.
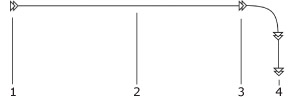
Movie cameras are shown on the floor plan as icons with two triangles directed from the beginning to the end of the movie track. Interpolated points are represented by a line.
1 – The beginning of the movie track (the first movie camera)
2 – Movie track
3 – Intermediate movie camera
4 – The end of the movie track (the last movie camera)
To select a movie track or a movie camera, tap on it on the floor plan. A selected movie camera has four handles.
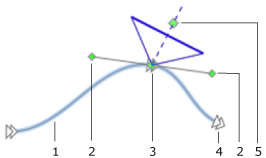
1 – Selected movie track.
2 – Camera control points to change the curvature of the movie track.
3 – Selected camera. Drag the handle to move the camera.
4 – Not selected camera.
5 – Camera direction point. Drag the handle to rotate the camera.

The location and direction of movie cameras as well as the shape of movie track segments can be changed after creating the track.
Use as few movie cameras as possible. Intermediate movie cameras are needed to create turns on your movie track. A straight movie track requires only two cameras at its ends.
The creation of a movie track in the 3D view is based on walking through your virtual space and saving key points as movie cameras.
To begin, open the 3D view and the Cameras tab of the Inspector. In the 3D view, walk to the point where your movie should begin. Tap the Add Movie Track button in the Inspector.

This will create a new movie track and add a movie camera to it. Walk to the next point and add one more movie camera using the Add Movie Camera button.

In this way add several movie cameras until you reach the end point.
While recording a movie, the program automatically passes all intermediate points between movie cameras. Since that, you don't have to add movie cameras too frequently. If your path is straight, add two cameras to define the beginning and end of the track.
After creation of a movie track, you can modify it on the floor plan.
Moving a movie camera around changes where the movie track passes through you project. This affects only movie track segment(s) which are connected to the camera you relocate.
To change the curvature of track segments without moving cameras, drag the control points of the camera connected to those segments.
Also you can rotate movie cameras without changing the shape of the movie track. This lets you move along the same trajectory but look in a different direction.
The 3D view is useful to adjust the direction or elevation of movie cameras. Select a movie camera. Then rotate, move vertically, or walk around. Don't forget to deselect the movie camera as soon as you are satisfied with its orientation.
To create a movie, select a movie track and choose Export > Record Movie in the app bar. Then choose the frame rate and size, and specify a file name and path.
Tip: Creating movies with a long track, or with high resolution or frame dimensions may take quite long. Choose minimum resolution and/or frame rate to create a preview movie. When you are sure that all the movie cameras are positioned well, create a movie of the desired quality.
You can loop a movie track by connecting the beginning and end of your movie track. To do this, select the movie track, bring up its context menu and choose the Loop Movie item. The program will automatically add a new track segment to close the track. If you deactivate the loop option, the added segment will disappear.
To play back such a movie, open it in in a video player and activate the Loop mode Then start playing the movie.