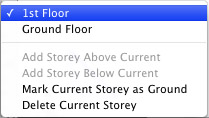
The upper section displays a list of storeys in the project. The lower section lets you add and remove floors. You can also choose the current floor to be the ground floor.
| www.belightsoft.com/liveinterior | Start of Help | Index > Live Interior 3D Workspace |
The 2D view window is used for drawing floor plans.
To open the 2D view, choose the View > Toggle 2D/3D View menu command or click the 2D View button in the toolbar (item 10 in the The Toolbar section below).
In the 2D view, you can add objects from the library and draw walls, floors and ceilings.
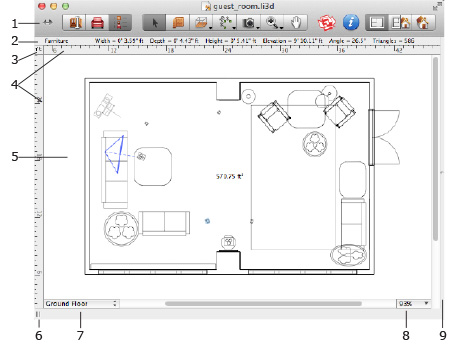
1 – The toolbar (see The Toolbar section below).
2 – The Information bar shows detailed information about
the selected object, such as its dimensions, elevation and orientation.
The bar disappears when you hide the rulers.
3 – Click on the current measurement unit to choose another in the Project
Setup.
4 – Rulers. To toggle the rulers on/off, use the View > Hide/Show Rulers (Cmd-R) menu
command.
When you move an object with the mouse in the 2D View, the rulers can
display rulerlines. Rulerlines are thin lines that show the coordinates of left, right, top and bottom object edges on the rulers. Rulerlines move along with
the object. To control rulerlines, use the View > Rulerlines menu.
5 – The 2D view area.
6 – The handle of the splitter bar that separates the Library panel and 2D View. Move it to the right or to the left to make the Library panel bigger or smaller.
7 – Storey pop-up menu.
The upper section displays a list of storeys in the project. The lower section
lets you add and remove floors. You can also choose the current floor to be
the ground floor.
8 – Zoom control.
9 – Splitter bar between the 2D and 3D views.

1 – The Selection tool for choosing and moving objects.
2 – The Straight Wall tool for drawing walls.
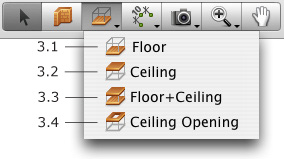
3 – Tools for working with slabs.
3.1 – The Floor tool. You can add a floor manually instead of the floor added by the program.
Related topic: Ceilings and Floors
3.2 – The Ceiling tool. You can add a ceiling manually instead of the ceiling added by the program.
Related topic: Ceilings and Floors
3.3 – The Floor+Ceiling tool. Use it for adding a floor and ceiling objects together. The result is as if you draw a floor using tool 3.1, and then draw a ceiling right over the floor using tool 3.2.
3.4 – The Ceiling Opening tool. Creates an opening in a slab of the current storey.
Related topic: Staircases
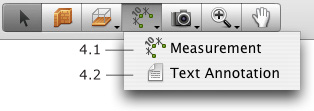
4 – Tools for adding auxiliary objects.
4.1 – The Measurement tool. Defines distances between the specified points.
Related topic: Measurement Tool
4.2 – Text Annotation. Adds text boxes for typing or pasting text.
Related topic: Text Annotation

5 – The Camera tools.
5.1 – The Camera tool. Adds individual cameras.
Related topic: Using Cameras
5.2 – The Movie Track tool. Adds movie cameras. A chain of these cameras
defines a movie track.
Related topic: Creating Movies
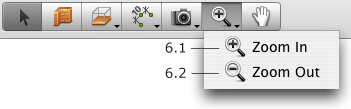
6 – Zoom.
6.1 – Zoom In.
6.2 – Zoom Out.
7 – The Pan tool ("scrolling hand") for scrolling the 2D view with the mouse.
An activated tool is highlighted.
The Straight Wall, Floor, Ceiling, Floor+Ceiling, Ceiling Opening, Text Annotation and Camera tools have two active modes.
Upon a single click, the tool activates in the standard mode. After adding or modifying a corresponding object, the tool becomes deactivated and the Selection tool becomes active.
Upon a double-click, the tool activates in the continuous mode. After adding or modifying a corresponding object, the tool stays active and you can continue working with it. This is useful if you need to add, for instance, several cameras.
![]()
8 – Browse the Trimble 3D Warehouse on-line collection.
9 – Open Inspector.
10 – Display the 2D view.
11 – Display the 2D and 3D views together.
12 – Display the 3D view.