| www.belightsoft.com/liveinterior | Start of Help | Index > Working with Projects |
You can create a movie as you walk through your 3D space. Live Interior uses the MOV file format to save movies.
If you need to create a panorama of the 3D space, see Exporting 3D Views to QTVR.
Movie creation begins with creating a movie track that is a path along which an imaginary video camera moves. You can place multiple movie tracks in your project. A movie track can be edited at any time. To create a movie, you should select a movie track and start the process by clicking the Record Movie button below the movie track list in Inspector > Cameras.
A movie track is made up of one or several straight or curved segments. The track runs over anchor points – movie cameras. End points of the movie track are also movie cameras. When you create a movie track, you place movie cameras in some key points in the 3D space. Intermediate points will be interpolated automatically according to a Bézier curve.
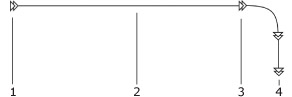
Movie cameras are represented on the floor plan by an icon with two triangles. Interpolated points are represented by a line. The arrows in the movie camera icon define the direction of camera movement along the path.
1 – The beginning of the movie track (the first movie camera)
2 – Movie track
3 – Intermediate movie camera
4 – The end of the movie track (the last movie camera)
Ways to select a movie track:
A selected movie track is highlighted on the floor plan by blue color.
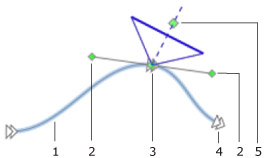
1 – Selected movie track
2 – Camera control points
3 – Selected camera
4 – Deselected camera
5 – Camera direction point
To select a movie camera, click on it on the floor plan, or choose it in the list under the corresponding movie track on the Cameras tab of the Inspector window.
A selected movie camera may also define a point of view for 3D view as an ordinary camera. In this case, a viewing frustum (blue triangle) next to it displays the direction of the camera.
The preview in the Project Tree displays the view produced by the selected movie camera.
A simplified process of movie track creation is described below. A more detailed way can be found in Creating and Modifying Movie Tracks in 2D.
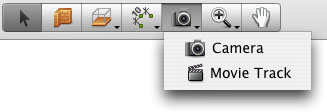
1. Click the Movie Track tool in the 2D toolbar.
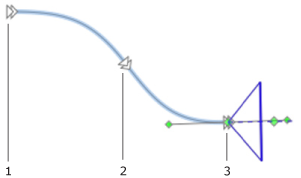
2. Click with the mouse on the floor plan where you want the movie track to begin (point 1 in the picture below).
3. Make more clicks to add more movie cameras to the current track (point 2 in the picture below).
4. Double click to locate the last camera (point 3 in the picture below).
The location of movie cameras, the shape of track segments and the direction of cameras can be changed after creating the track.
Important!
The number of movie cameras depends on how curvy a movie track should be. A less curvy track requires less intermediate cameras. A straight track requires only two cameras at its ends.
Do not add unnecessary intermediate cameras.
Extra intermediate cameras are needed for a more accurate creation of a track with a complex shape.
A simplified process of movie track creation is described below. A more detailed way can be found in Creating and Modifying Movie Tracks in 3D.
1. Walk to a point in 3D that should be the start point for your movie.
2. Open the Cameras tab of Inspector and click the Add Movie Track from 3D Viewpoint button (3D view should be open). The icon of the button indicates the current mode.
Add Movie Track mode |
The icon of the button will turn into the image below, indicating that new cameras will be added to the current track by clicking the button.
| Add Movie Camera mode In this mode, clicking the button adds a new camera at the end of the selected track. |
Note: For creating a new track none of existing movie tracks should be selected. To deselect a movie track in the Inspector, click the Movie Tracks title above the list of movie cameras.
3. Move in the 3D space to the next position. If necessary, adjust the orientation, tilt and elevation of the camera.
4. Click the Add Movie Camera from 3D Viewpoint button in the Inspector.
5. Repeat steps 3 and 4 to add more movie cameras.
You can change the shape of a track on the floor plan by:
To change the location of a movie camera, select a movie track and drag the camera to a new place.
To change the shape of a track segment without moving cameras, drag camera control points around the corresponding camera.
You can see the view from any movie camera in the 3D view. To do this, select it in the Camera Properties tab of the Inspector. If you start walking around, the camera will change its location and direction correspondingly. This way you can adjust key points of the movie track.
A camera icon in the top-right corner of the 3D view appears when a movie camera is selected. This indicates that if you walk in 3D, its position will change.
![]()
To create a movie from a movie track:
After creating a movie, the program offers to play it.
Tip: Creating movies with a long track or with high resolution may take quite long. Choose minimum resolution and/or frame rate to create a preview movie. When you are sure that all the cameras are positioned well, create a movie of the desired quality.
You can loop a movie track by placing the beginning and the end of the movie track at the same point. To do this, select a track, bring up its context menu and choose the Loop Movie item. Live Interior will automatically add a new track segment to close the track. If you deactivate the loop option, the added segment will disappear.
To play back such a movie, load it in QuickTime and select the View > Loop option in its menu. Then click the Play button.