How to Upgrade to macOS Monterey Without Data Loss
Another year has flown by, and we all still remember anticipating the Big Sur release. Now the time has come to delve even deeper into California exploration with yet another macOS celebrating the locations around the state—Monterey. Did you know that Monterey and the surrounding area have attracted artists since the late 19th century, and many celebrated painters and writers have lived in the area? Not just fishermen and breathtakingly beautiful bridges, but a whole cultural mecca. Apple knows the right locations!

What can you expect this year and how should you prepare for it?
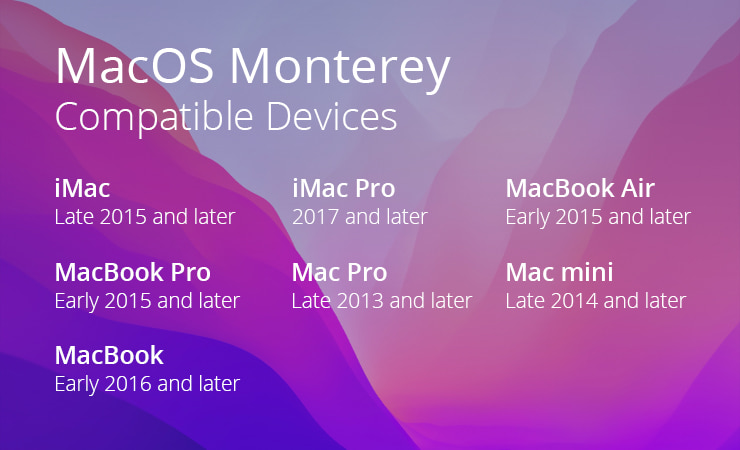
General notions: macOS Monterey inherits the numeration from the tradition Big Sur has been first to introduce—it bears the number 12. Ironically, it will not install on 2012 Macs. The full list of compatible models is on the official website.
Social: FaceTime will get the SharePlay feature, anxiously anticipated by many people who were eager to watch their favorite series online with friends and family all over the world, but were forced to use other apps during the pandemic. Moreover, the new Spatial audio will help you recognize the speaker's position in front of the screen, making the shared experience even more magically realistic.
Work: Safari gets the new tab bar, taking less space and organizing your work beautifully. Tab groups are also a gem, being in sync across all your Apple devices. Universal control allows you to put your devices next to each other and move your cursor seamlessly between them without any setup! One more piece of great news: the Focus feature will allow you to concentrate on work while letting your friends and colleagues know you’re deep in thought at the moment, writing an article or maybe some strings of code.
Fun: the feature you’ve all been waiting for—AirPlay to Mac. Now you can share and make any info bigger by letting your iPhone and iPad send the image/video/text to your Mac. Moreover, now your Mac even allows you to interact with the text in any image thanks to Live Text in photos.
Explore: Maps deliver a new level of detail, enabling you to visit the landmarks during both day and night.
As usual, there are loads of other improvements, but these shiny ones will hopefully keep you motivated to upgrade.
Upgrade to Monterey Steps
But, back to our backups (pun intended). All successful companies start from meticulous and boring business plans. All successful upgrades should start from boring, but really useful backups. Have you checked if all your precious files are in place and have a second (and third) backup? Do you have a bootable backup to restore the previous system? Have you made sure your hard and cloud backups are in place?
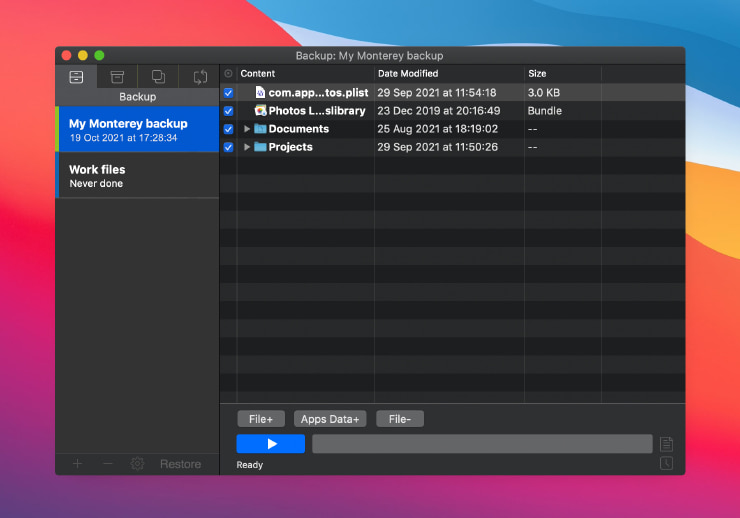
If not, Get Backup is here to help. Not only do you get a free trial of full features to get all things done, but you also receive an invaluable ability to make a backup of your files a part of your routine with Scheduled Backups. But, even that is not the last of the useful Get Backup features.
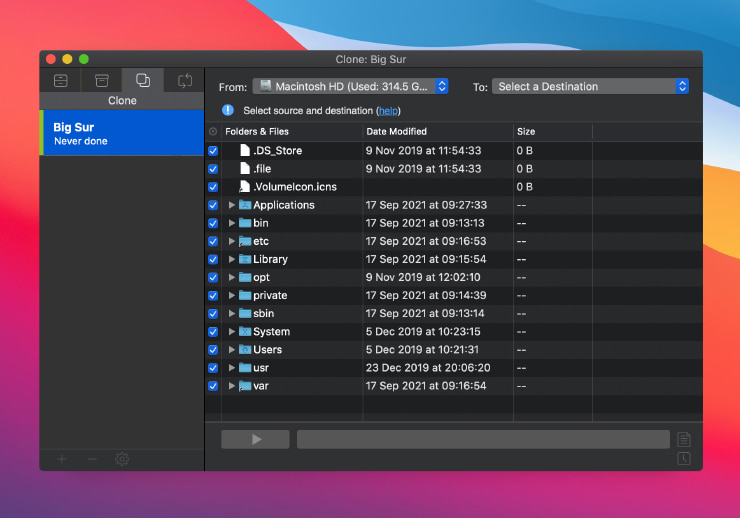
One of the most popular options during a system upgrade is creating a bootable clone of your disk. That allows you to retrieve all your data and the system “as is” without any changes so that the fear of losing work is never lingering over you.
Upgrade Was Unsuccessful. Please, let me go back!
So, you’ve upgraded and didn’t like it. Believe it or not, such things happen! Strange Safari Tabs; losing your mouse only to find its cursor on the iPad; mail search giving you a hard time—it can be anything on your frustration scale higher than a 3.
Imagine the issue is real and, for some reason, has not been corrected after Beta. Such things happen frequently when the system becomes unstable or slows down your device, or an app that is your favorite or a must for your work drives you mad by its sluggishness, or even some app that you were relying on in your routine work doesn't run on the latest macOS.
Take a deep breath here; let’s move back to stay forward. Good old Big Sur is waiting for you on the clone backup you’ve created earlier.
How to Downgrade to macOS Big Sur
Let’s spell this together: P-R-E-P-A-R-A-T-I-O-N. If you hate me for it now, you’ll love this piece of advice should you need to use it.
Imagine that you spent some time on the newly installed Monterey and then realized that you like Big Sur better. Before deleting the new system, make a backup of files and folders that are not part of your Big Sur clone that you previously made. These backed-up files and folders can be easily transferred to the Big Sur system after restoring it, and be sure that the work done on Monterey is not lost.
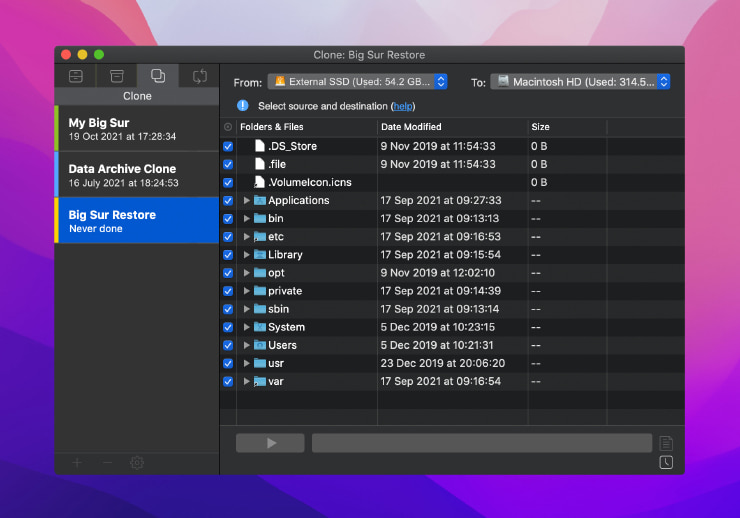
It’s time for the Big Sur system clone to shine! Boot from the clone and format the container where Monterey is (everything there will be erased) in APFS. Start Get Backup and now clone your system in the new APFS container on your computer. Reboot into “the new old” system.
It’s a piece of cake!
Julia Shtelmukhova
Revised: March 2022