| www.belightsoft.com/liveinterior | Start of Help | Index > Live Interior 3D Workspace |
The 3D view displays a 3D model of your project. In the 3D window, you can change materials, adjust lighting and place objects. You can also walk around in the 3D space and take pictures.
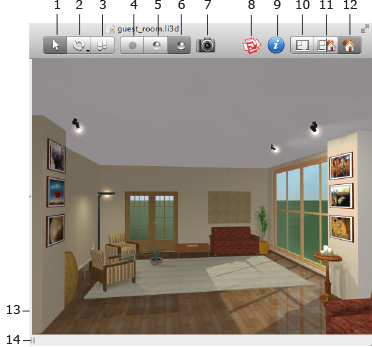
1 – The Selection mode. In this mode, the mouse can be used for selecting and moving objects. To walk around, click on the arrows of the 3D Walk Control, or use the arrow keys.
2 – The Look Around and Fly Around modes. Using the mouse, you can change the view direction or fly around a fixed point.
3 – The Walk mode. The mouse cursor turns into an arrow showing the walk direction. To change the direction, move the cursor to sides or corners of the 3D view. To walk, press the left mouse button.
4 – Display the picture without lights and shadows. The lowest quality, the highest walk speed.
5 – Display the picture with lights but without shadows. Intermediate quality and walking speed.
6 – Display the picture with lights and shadows. The highest quality, the lowest walk speed.
7 – Take a picture of the 3D view.
8 – Browse the Trimble 3D Warehouse on-line 3D object collection.
9 – Open Inspector.
10 – Display the 2D view.
11 – Display the 2D and 3D views together.
12 – Display the 3D view.
13 – The splitter bar between the 2D and 3D views. Move the splitter bar to expand one view while at the same time narrowing down another view.
14 – The handle of the library of objects. Move the handle to change the panel
width.
In the top right corner of the 3D preview, a camera icon may be displayed. Its purpose is described in the Using Cameras section.
![]()
One of the possible ways to move inside your 3D model is to use the Walk Control. This is a round control that is sensitive to mouse clicks. The direction of movement depends on the point where you click on it.
The Walk Control appears at the bottom of the 3D view when you move the mouse cursor over this area. This happens in the automatic mode. There are two other modes: the control is always displayed or never displayed. To choose a mode, use the View > Display 3D Walk Control menu. The control is semi-transparent and lets you see the space behind it.
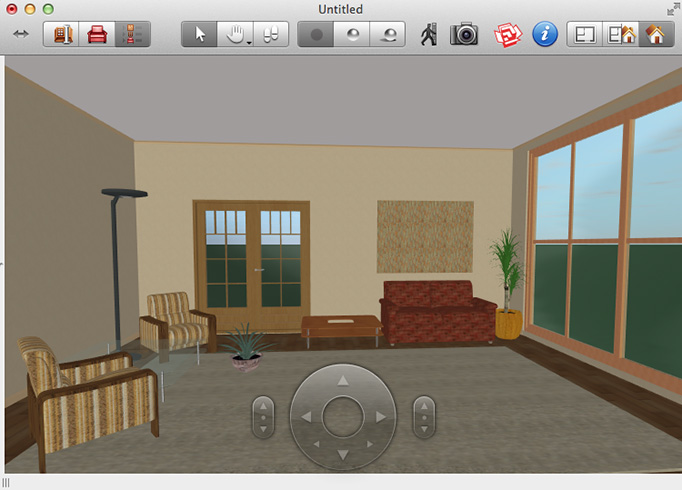
Note that the Walk Control is not displayed when the Walk mode is selected in the View > 3D View > Tools menu.
The current view point can be fine tuned using the Cameras Controls in the Cameras Properties tab of the Inspector.
Walk Control
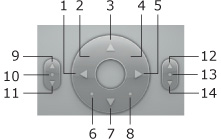
1 – Turn to the left.
2 – Move forward turning to the left.
3 – Move forward.
4 – Move forward turning to the right.
5 – Turn to the right.
6 – Move leftward.
7 – Move backward.
8 – Move rightward.
Camera Pitch
9 – Tilt Up – look upwards.
10 – Restore the default tilt (double-click) – look straight forward.
11 – Tilt Down – looking downwards.
Camera Elevation
12 – Move the camera up.
13 – Restore the default level (double-click).
14 – Move the camera down.
The program offers several methods of walking and turning around in the 3D space:
You can control whether or not you can walk through walls and other objects. To do this, use the Consider Collisions toolbar button View > 3D View > Consider Collisions. The program disables the Consider Collisions mode when you walk while a user camera is selected (the camera icon in the right top corner of the 2D view indicates this).
If the current camera or view point is located in an improper position (inside a wall, for instance), the program temporarily disables the Consider Collisions mode which is indicated in the 3D view by the following icon:

The keyboard arrow keys are used for moving forward, backward, and turning left and right. Alternative shortkeys are shown in brackets.
| Up (W) | Move forward |
| Down (S) | Move backward |
| Left | Turn to the left |
| Right | Turn to the right |
| Cmd-Up (Q) | Tilt the camera up |
| Cmd-Down (Z) | Tilt the camera down |
| Option-Up (E) | Move the camera up |
| Option-Down (C) | Move the camera down |
| Option-Left (A) | Move the camera leftward |
| Option-Right (D) | Move the camera rightward |
The walking speed depends on the rendering quality. At a higher quality setting, the movement will be slower.
Use the rendering quality control to set the most appropriate quality. When taking a picture (export the 3D view), set the maximum quality.
The Look Around and Fly Around tools can be activated either in the View > 3D View > Tools menu or in the 3D Toolbar. In the toolbar they share the same button. To activate the selected tool, click the toolbar button or press the Space key. To select and activate other tool, click the button and hold it for a while. Then choose a tool in the pop-up menu.
In the Look Around mode, your location is fixed. You can change the view direction.
In the Fly Around mode, you can fly around a point specified in the 3D view this way. Place the cursor at the desired point, press the left mouse button and then move the mouse around.
To change the view direction in both Look Around and Fly Around modes, place the mouse cursor over the 3D view, press the left mouse button, and move the mouse.
To move an object horizontally in the 3D view, drag it with the mouse.
The state of the Glue By option in the Inspector (the Object Properties tab) defines the vertical location of the object in relation to the floor and
other objects. When the option is disabled, the object movement is strictly
horizontal.
When it is enabled, the object can change its elevation. For example, if you
move a vase off a table, it will fall onto the floor.
Holding the Cmd key temporarily disables the Glue By option. When you
release Cmd or the mouse button, the object will have the elevation that it
should have according to the Glue By function.
To move an object in a vertical plane (perpendicular to the current view direction), hold the Opt key.
The Glue By and Lock Elevation options prevent changing the elevation accidentally. Disable them to change the object’s elevation.