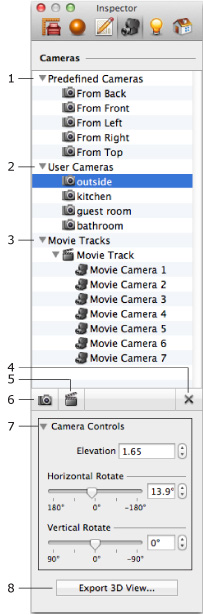
 The Cameras Properties tab lists all the cameras in the current project: predefined, custom and movie cameras.
To open this tab, choose Window > Inspector > Cameras.
The Cameras Properties tab lists all the cameras in the current project: predefined, custom and movie cameras.
To open this tab, choose Window > Inspector > Cameras.| www.belightsoft.com/liveinterior | Start of Help | Index > Using Cameras |
Cameras are special objects used to specify locations and perspectives in the 3D space for taking pictures. Cameras can be also used as the starting point for walking around in 3D. Choosing such a pre-defined camera, you can quickly jump to a specified location at any time.
By default, five cameras (views) are set up in the project. Their locations are fixed (you cannot remove them), and they are not shown on the floor plan.
You can add more cameras to save your favorite points of view. Custom cameras behave in almost the same way as ordinary objects, and they are visible on the floor plan. You can change their direction, move and delete them.
Let’s suppose you want to take pictures of a room from three points, change the color of walls or furniture, take another series of pictures, and then compare them to choose the best color combination. In this case, you will put three custom cameras in the desired positions, and after changing the wall color, select a camera from the list and save a picture.
The Cameras Properties tab lists all the cameras in the current project: predefined, custom and movie cameras.
To open this tab, choose Window > Inspector > Cameras.
Unlike predefined cameras, custom cameras and movie cameras can be added and removed by the user.
The Inspector lets you select any existing camera, including movie cameras. The selected camera defines what is displayed in the 3D view.
New cameras and movie tracks have default names. To change the name, double-click on it.
1 – The list of predefined cameras. Their quantity is constant. Their location in the 3D space cannot be changed.
2 – The list of custom cameras.
3 – The list of movie tracks. Sub-items of each movie track are movie cameras. For more information, see Creating Movies.
4 – The Delete button lets you delete selected custom cameras, movie tracks and movie cameras.
5 – Add Movie Track from 3D Viewpoint (Add Movie Camera from 3D Viewpoint) lets you add a movie camera to an existing movie track or create a new track. The button is activated when the 3D view is visible.
If a movie track or a movie camera is selected in the list, clicking the button adds a new camera to the current movie track. Otherwise a new movie track is created.
The location and orientation of the added camera corresponds to your current position and point of view in the 3D view.
6 – Add Camera from 3D Viewpoint lets you add a new camera. The location and orientation of the added camera corresponds the current 3D view.
7 – Controls that allow you to adjust the elevation and orientation of custom cameras and movie track cameras. These tools can also control the current point of view that isn't linked to any camera.
8 – Export an image or create a movie. The function of this button depends on the type of selected camera.
Export 3D View… – export a picture from the current 3D view. This button does the same as the File > Export 3D View menu item.
Record Movie… – start the process of creating a movie from the selected movie track.
All predefined and user cameras are available in the Cameras Properties tab of the Inspector window (the User Cameras section). Custom cameras are also listed in the Project Tree.
To jump to a saved position in the 3D view, select a camera in the Inspector.
If you select a custom camera and walk around in the 3D view, the camera will change its location to reflect your current position. This way you can better adjust the location and direction of the camera.
The preview in the Project Tree displays the view of the selected custom camera.
To prevent the occasional movement of a camera, lock it in the Project Tree. Alternatively, click on another object in the 3D view (a wall, for instance) to deselect a custom camera and then start walking.
A camera icon in the top right corner of the 3D view indicates that a custom camera has been selected and that its position can change.
![]()
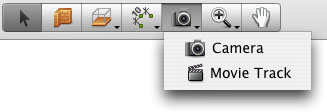
To add a camera, use the Camera tool from the toolbar above the 2D view.
While walking around in the 3D view, you may want to save some viewpoints to return to them later. To do this, click on the Add camera from 3D Viewpoint tool in the Cameras Properties tab of the Inspector.
All user cameras are listed in the Cameras Properties tab of the Inspector and in the Auxiliary section of the Project Tree.
To delete a custom camera, select it in the Inspector and click on the “x” button.
To rename a camera, double-click on its name in the Inspector.
Cameras can be also renamed or deleted using the Project Tree.

To move a camera, drag it with the mouse, or select it and press the arrow keys. This results in parallel movement (without rotation).
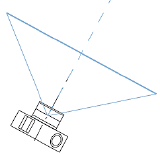
When selected, the camera has two handles: the front one (the upper dot on the picture) and the central one.
When you move the front handle with the mouse, the camera turns around the central handle point. The camera location stays unchanged.
By dragging the center handle, you will move and rotate the camera at the same time.
The viewing frustum and the view direction of the active camera are displayed in the 2D view. Use them to point a camera to some place or object. You can turn the frustum on or off using View > Show 3D Viewpoint.
Most likely, you do not need to have cameras visible on the printed floor plan.
To hide cameras, open the Project Tree (Window > Project Tree),
select the camera(s), and click on the “eye” icon to make the camera(s)
invisible.