| www.belightsoft.com/liveinterior | Start of Help | Index > Working with Objects |
Various pieces of furniture have similar behavior in the program, so the term “object” will be used for all of them except when we need to describe the difference between them.
To add a piece of furniture:
Furniture can be added from the built-in library or imported from a 3D model file.
To remove an object, select it and press the Delete or Backspace key.
To select an object, click on it with the mouse.
To select several objects, click on each of them holding down the Shift key, or use the mouse to draw a selection frame over them.
All the objects used in the layout are listed in the Project Tree. You can select objects by clicking their names in the list.
To move an object, drag it with the mouse. You can move objects in both the 2D and 3D views.
The Information bar shows object’s width, height, depth, elevation and angle. The bar is located above the horizontal ruler. To show or hide the Information bar and rulers, press Cmd-R.
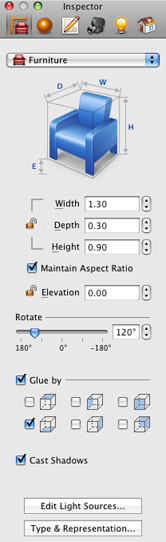
Most of the furniture parameters can be modified in the Inspector window.
The Project Tree lets you control the Visibility and Lock options.
To change an object's properties such as the orientation in 3D, the origin point and 2D representation, select the object and click the Type & Representation button in the Inspector. The program will open the Type & Representation dialog
Since the library does not have all possible pieces of furniture, you may want to adjust the existing objects for your needs.
All adjustable parameters can be found in the Object Properties tab of the Inspector window.
To resize the object, select it first, then unlock the dimensions you want to modify, and enter the new values.
To resize the object proportionally, select the Maintain Aspect Ratio option.
To rotate an object, use the Rotate tool in the Inspector window.
To change the elevation of an object, use the Elevation tool in the Inspector window.
The 3D view lets you drag an object with the mouse upward or downward, but this is less accurate.
The Elevation parameter can be locked/unlocked by clicking the lock icon. Locking the elevation is useful when you need to move an object only horizontally in the 3D view (for example, to distribute things over a table).
|
|
| A Sofa in the 2D View |
The location of most of the objects in the room is pre-determined by their purpose. For example, tables and chairs are always located on the floor; wardrobes and bookcases stay on the floor near a wall. Most lamps hang from the ceiling or are affixed to a wall.
The program takes this characteristic of the objects into account. This is especially convenient when you move an object in the 3D view: it stays stuck to the selected surface. So you do not need to worry about chairs and lamps hovering somewhere between the floor and the ceiling.
The Glue By set of options in the Inspector window lets you select up to three object sides that will stick to walls, the floor or the ceiling. The left, right, front and back sides can glue to walls; the top side can glue to the ceiling, and the bottom side - to the floor.
When the Glue By option is checked and you bring the object close to a wall, it sticks to the wall. The program may rotate an object if his is necessary to place it parallel to the wall.
Objects like TV sets, computers, and cookware are usually located atop other objects such as tables and stands.
For example, let's place a TV set onto a table. To be able to change the elevation of the TV set, unlock its Elevation property in the Object Properties tab of the Inspector by clicking on the lock icon.
Way 1 (works when the TV set object is higher than the table) – Drag the TV set over the table in the 2D or 3D view. The TV set will automatically jump onto the table.
Way 2 (the object's height doesn't matter) – Drag the TV set over the table in the 2D or 3D view. If the table's top is higher than the TV set, the latter will appear under the table. Increase the Elevation value in the Inspector to lift the TV set until it is on the table.
Way 3 (the object's height doesn't matter) – Drag the TV set over the table in the 2D or 3D view. If the table's top is higher than the TV set, the latter will appear under the table. Press Cmd-Opt and drag the TV set upwards in the 3D view.
The Cast Shadows option allows you to turn on/off rendering shadows. This can be useful to:
Lamps are found in a separate section of the Furnishing tab. In addition to the parameters that furniture items have, lamps allow you to change color and luminosity of light. These parameters can be modified in the Light Properties tab of the Inspector window.
Use the Materials tab of the Inspector to apply or change a material. See Applying Materials for more detail.
By default, objects are displayed on the floor plan by a simple outline. You can choose another image in the Type & Representation dialog. Another option is to use the view of the object from above in 3D. You can select the type of 2D representation in the 2D Properties tab in the Inspector.
To help distinguish objects in the 2D view, apply different stroke colors and pattern fills. They can be changed in the 2D Properties tab in the Inspector.