Creating and Modifying Movie Tracks in 3D
Creation of a Movie Track in 3D
- Walk to the point in 3D that should be the start point for your movie.
- Open the Cameras Properties tab of Inspector. The 3D view should be open for further operations.
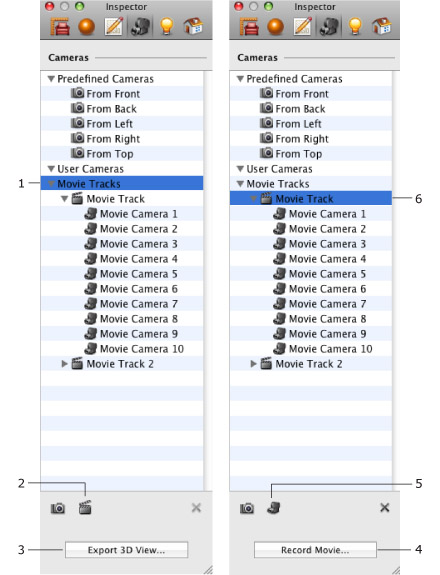
Make sure all the existing tracks in the list are deselected. To do this, click the Movie Tracks category title (1).
- Click the Add Movie Track from 3D Viewpoint button (2) in the Inspector.
If Add Movie Camera mode is activated (in this case, the button icon looks like 5), which means an existing movie track is selected (see step 2).
Clicking the Add Movie Track… button creates a new track with a new movie camera located at your current position in the 3D space.
- Move in the 3D space to the next position. If necessary, adjust the orientation, tilt and elevation of the camera by using controls in the 3D toolbar.
- Click the Add Movie Camera from 3D Viewpoint button (5) in the Inspector.
- Repeat steps 4 and 5 to add more movie cameras.
The location and orientation of movie cameras can be changed later in the 3D or 2D view.
Changing the Location and Orientation of a Camera in 3D
- Open the 3D view and the Cameras tab of the Inspector.
- Expand the corresponding movie track to see the list of included cameras. To do this, click a triangle next to the track name (4).
- Choose a movie camera. When you select a camera, the 3D view renders a picture taken by it. This must help you to find a camera you need.
- Use the walk controls in the 3D toolbar to adjust the location and orientation of the selected camera.
- Repeat steps 3 and 4 to adjust more cameras.
- When finished, deselect the current movie camera in the list by clicking on the Movie Tracks category title (1), or on a blank line in the Inspector camera list.
Note, if you leave any camera selected and start walking in 3D, its location will change following your current position.
Adding New Cameras at the End of the Existing Track
To continue adding cameras to the end of an existing movie track:
- Open the 3D view and the Cameras tab of Inspector.
- Select a movie track in the list, but not a camera.
- Walk to some location to define the place for a new movie camera. Adjust its orientation if necessary.
- Click the Add Movie Camera from 3D Viewpoint button (5) in the Inspector.
- Repeat steps 3 and 4 to add more cameras.
- When finished, deselect the current movie camera in the list by clicking on the Movie Tracks category title (1), or on a blank line in the Inspector camera list.
Note, if you leave any camera selected and start walking in 3D, its location will change to your current position.
Removing Movie Cameras or Tracks
- Open the Cameras tab of the Inspector window.
- Click the triangle next to the Movie Tracks category to expand it.
- Select a camera or track and click the Delete button below the list of cameras in the Inspector (or hit the Del key).
To select a camera, expand some specific movie track to get all the included movie cameras displayed.