Creating and Modifying Movie Tracks in 2D
A Simple Way of Creating a Movie Track
A simple way of creating a movie track is as follows:
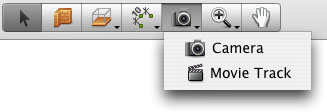
- Click the Movie Track tool in the 2D toolbar.
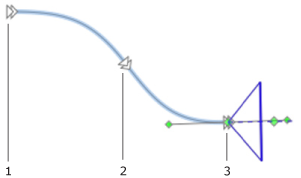
- Click with the mouse on the floor plan where you want the movie track
to begin (step 1 in the picture below).
- Make more clicks to add more movie cameras to the current track (step
2 in the picture below).
- Double click to place the last camera (step 3 in the picture below).
The location of movie cameras, the shape of track segments and the direction of cameras can be changed after creating the track.
Setting the Camera Direction while Creating a Movie Track
The following method lets you point a new camera while adding it. Another
way is to change the camera direction after the track is created.
The process of creating movie tracks is as follows:
- Click the Movie Track tool in the 2D toolbar.
- Place the mouse cursor on the floor plan where you want to place the
first movie camera.
- Press the mouse button (the left one for 2-button mice). Keeping the
button pressed, move the mouse to change the camera direction. Then release the button.
- Repeat steps 2 and 3 for adding more cameras.
- After adding the last camera, press the Esc button.
The location of movie cameras, the shape of track segments and the direction of cameras can be changed after creating the track.
Keeping the Last Segment Unchanged while Creating a Movie Track
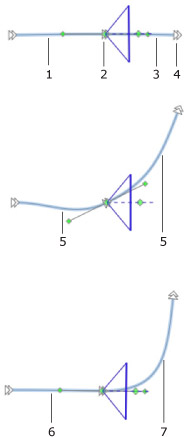
When you are moving the mouse cursor while adding a new movie camera (4), two track segments, before and after the last added camera (2), change according to the location of the cursor (4). Segments (1) and (3) are straight. After the camera moves, they become curved (5).
Press the Alt key if you wish to keep the previously added segment unchanged while moving around a new movie camera to find a better place for it. This will force the previous segment (6) to freeze when a new segment (7) reshapes following the mouse cursor (new movie camera).
Follow the steps below:
- Add one or multiple movie cameras.
- Add another movie camera (2) to your movie track by a click. Do not move the cursor until you press the Alt key.
- Place the mouse cursor where you want to place another movie camera.
- Click on the floor plan to place a new camera. Now you can release the Alt key, or keep it pressed to continue using the current mode..
Setting the Shape of the Current Segment while Creating a Movie Track
The following method lets you adjust the curvature of the last track segment while you are adding a new movie camera. Another way is to use the camera controls after the track is created.
The process of creating a movie track is as follows:
- Add one or multiple movie cameras.
- Click on the point on the floor plan where you want to place another movie camera, but do not release the mouse button.
- Press the Alt key and move the cursor around the camera to adjust the shape of the track segment. The direction of the camera will stay constant.
- Release the Alt key and continue adding new movie cameras, or finish the process by hitting the Esc key.
The location of movie cameras, the shape of track segments and the direction of cameras can be changed after creating the track.
Adding More Movie Cameras to an Existing Movie Track
To add a camera to the end of a movie track:
- Select a movie track by clicking on it on the floor plan.
- Click the Movie Track tool in the 2D toolbar.
- Click on the last camera of the selected track.
- Click somewhere on the floor plan to add new movie cameras.
Another way to continue adding cameras to the end of a movie track is to double-click the track in the 2D view. Then click on the floor plan to place new movie cameras.
To add a new movie camera before or after some specified camera on a movie track, select the existing camera, bring up the context menu and choose Add Movie Camera After or Add Movie Camera Before item.
Changing the Location of a Movie Camera
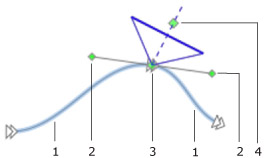
1 – Track segments
2 – Camera control points
3 – Selected camera
4 – Camera direction point
To change the location of a camera:
- Click on a camera in 2D to select it.
- Drag the handle (item 3 in the picture above) to move the selected camera to a new place.
Adjusting the Direction of a Movie Camera
You can change the direction of any movie camera after a movie track is created. To do this:
- Click on a camera in the 2D view to select it.
- Drag the camera direction handle (item 4 in the picture above) to rotate the selected camera.
Adjusting the Curvature of Movie Track Segments
To adjust the track segments (1) located next to a specific movie camera (3):
- Click on a camera in the 2D view to select it.
- Drag the camera control handle (items 2 in the picture above) to modify the shape of track segments.
Removing a Movie Camera
To remove a movie camera, select it on the floor plan by clicking the mouse and press the Del button.
Or, do the following:
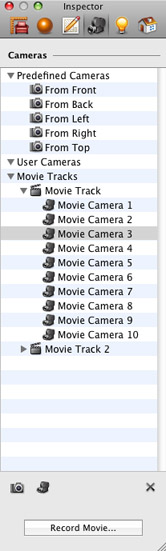
- Open the Cameras tab of the Inspector window.
- Click the triangle next to the Movie Tracks category to expand it.
- Expand some specific movie track to get all the included movie cameras displayed.
- Select a camera and click the Delete button below the list of cameras in the Inspector (or hit the Del key).
Or, bring up the context menu for the selected movie camera on the floor plan and choose the Delete Movie Camera item.
Removing a Movie Track
To remove a movie track, select it on the floor plan by clicking the mouse (click on the line, not on a movie camera) and press the Del button.
Or, do the following:
- Open the Cameras tab of the Inspector window.
- Click the triangle next to the Movie Tracks category to expand it.
- Select a specific movie track and click the Delete button in the Inspector (or hit the Del key).
Or, bring up the context menu for the selected movie track on the floor plan and choose the Delete Movie Camera item.