Working with Objects
The Type & Representation dialog lets you change the properties of objects. This feature is available only in the Pro version.
To bring up the Type & Representation dialog, open the contextual menu of an object and choose Type & Representation… Another way to open the dialog is to tap on the Type & Representation… button in the Object Properties tab of the Inspector.
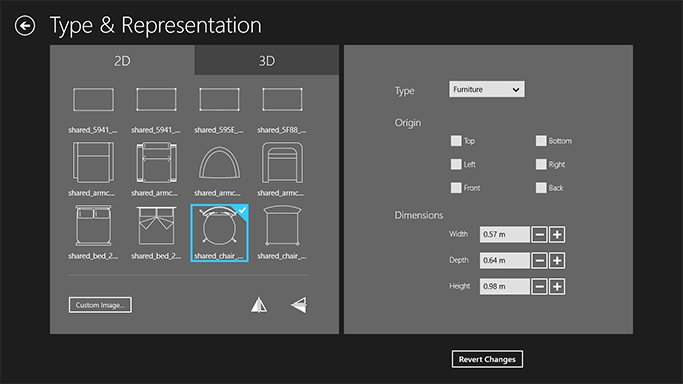
The dialog comprises of two parts. The left one lets you control how the object appears on the floor plan and in the 3D view. On the right side, you can choose the object type, and set up its size and origin.
The tools in the Type & Representation dialog change only one copy of the object: the one which was selected when you opened the dialog box. Other copies that may be present in your project remain unchanged.
The program uses the same model for all the copies of each object in the project. If you modify one of the copies, the program will have to create one more model specially for the changed object. So, using the Type & Representation dialog you can increase the total number of object models in the project. This may result in a decrease in the program’s performance.
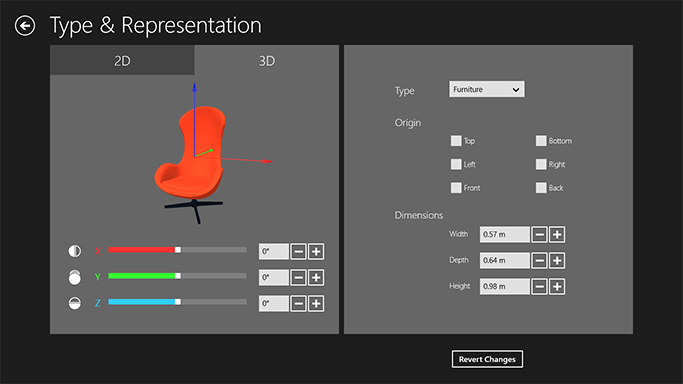
The 3D Representation box displays a preview of the 3D model.
To rotate the object, swipe over the preview. To zoom in or out, pinch or stretch with two fingers. To restore the default orientation and magnification of the model in the preview, double-tap on it.
The settings in the preview box do not affect the object, they change the preview picture only.
The Type is the most important object property. It determines the behavior of the object. You can set it to Furniture, Window, Door and Stairs. The difference is that windows and doors can be inserted into walls, while furniture cannot. Any object that is not a door or a window, should be specified as Furniture.
Rotating an object in the Type & Representation dialog changes object default orientation.
Changing the orientation of an imported object can be helpful when it came to your project upside-down or when a door or window was inserted across a wall.
To rotate an object, use the X, Y and Z controls in the 3D section.
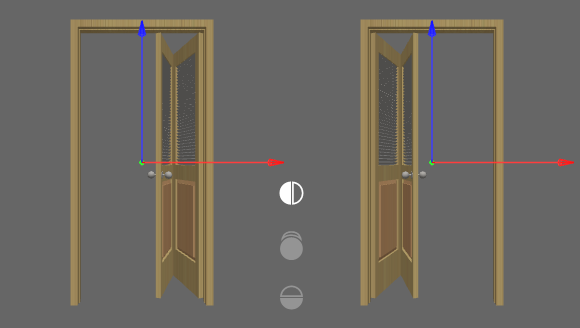
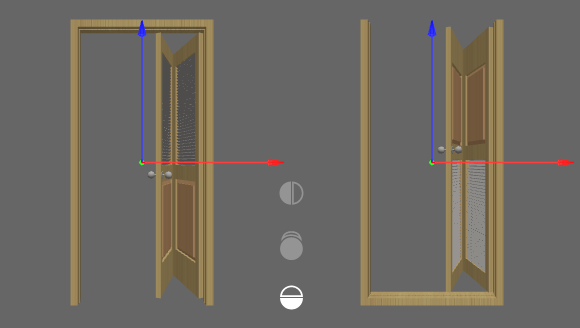
3D flipping lets you make several objects out of a non-symmetric model.
For example, by applying front-to-back and left-to-right flipping, you can create three new doors from a single model. This is especially helpful when the door handle on a wrong side of the door.
To flip an object, tap on the corresponding button in the bottom left corner in the 3D section.
The Origin options allow you to change the origin point.
The object origin is a point on the object surface that is used define its location in the 2D layout and in the 3D space. When you rotate an object, it rotates around its origin. So, changing the origin may change the object behavior.
The default origin corresponds the object type. For furniture, this is the center of the bottom; for wall pictures – center of the back surface; for ceiling lamps – the center of the top.
Dimensions determine the size of an object. The size can also be modified in the Inspector.
The 2D representation library shows the current object representation for the 2D view.
To choose an image from the library, tap on it.
To use a custom image, tap the Custom Image… button and navigate to a graphic file.
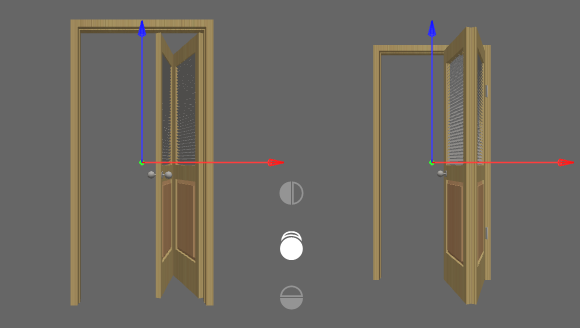
2D flipping mirrors a 2D representation. This is needed for matching an image for the floor plan with the 3D object. For example, after left-to-right flipping of the door, you should flip its image on the floor plan too.
Note that the 2D and 3D flip operations work independently for better flexibility. Make sure the 2D representation matches the 3D object.