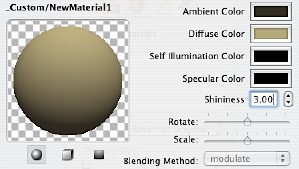
No specular reflection
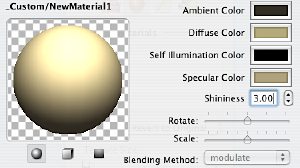
Specular reflection
with Shininess = 3
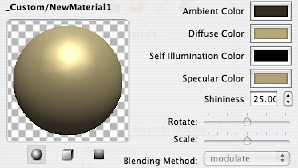
Specular reflection
with Shininess = 25
| www.belightsoft.com/liveinterior | Start of Help | Index > Working with Materials |
The Inspector window allows adding and adjusting materials. You can only change custom materials. The parameters of the supplied materials are displayed but cannot be modified, but you can make copies and modify them.
To open a material in the editor, double-click the material thumbnail in the Materials tab of the Inspector window (Window > Inspector > Materials).
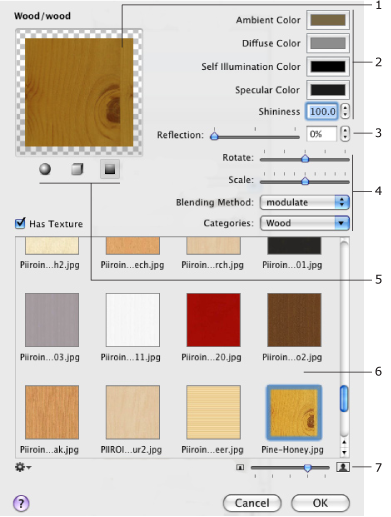
1 – Preview box.
2 – Color settings.
3 – Reflection (100% creates a mirror, 0% is no reflection).
4 – Texture settings.
5 – Preview mode switch.
6 – Texture library.
7 – Texture preview zoom control.
The preview shows your material applied to one of three shapes: sphere, cube or flat surface.
The preview has its own spot lighting and ambient lighting.
Ambient light is the constant amount of light that is present everywhere in the scene. So, the ambient color is the color of ambient light reflected by the object.
The way objects reflect light depends on the type of their surface. Uneven or granular surfaces reflect light in a number of angles that is called diffuse reflection. Glossy surfaces reflect light in one direction - this is specular reflection.
Generally, surfaces produce both kinds of reflection, but in different proportions.
The Shininess control lets you adjust the size of the specular reflection spot.
|
|
|
No specular reflection |
Specular reflection |
Specular reflection |
A self-illuminating surface looks like it is under the ambient light but is independent of ambient lighting. This feature can be used for elements of light sources (glass-shade, for instance).
Your material may or may not have a texture (check or uncheck Has Texture to control this). Textures can be taken from the built-in library (use the Categories drop-down list) or from a graphic file on your disk.
To import a custom texture, choose the Import Custom Texture item from the gear pop-up menu. The maximum allowed texture size is 512 x 512 pixels. When you import an image of a greater size for a new texture, the image will be scaled down. The original aspect ratio remains.
To remove a custom texture, right-click on it and choose Delete Current Texture....
The Scale slider adjusts the size of the texture pattern.
The Blending Method drop-down list has two color blending methods:
The texture for wall or floor tiles should render corresponding to the actual tile size. To achieve this, set the Scale slider in the material editor in the middle. Apply the texture to an object (wall or floor). Now you can set up the actual tile size. Select the object and click on a triangle to expand the Texture Transform section (Inspector, Materials tab) to access the texture size controls. Set the Texture Height and Texture Width to 12 if the tile size is 12 by 12 inches. Note that you should have inches selected in File > Project Setup.