Working with Cards
File storages are used to store files. Each file storage appears as a folder in the main window. This card gives you a way to set up the file storage properties, specify a category to include in, or delete it.
Physically, a file storage is an encrypted disk image. When you open the storage for use, the program mounts a disk image which appears in the Finder as a new disk. Use the Finder or another file manager to work with files in the storage. Disk images are located inside the active card repository. The location of the disk images that correspond to your file storages is described in Backing up Your Card Repository. When the disk image is mounted, its name in the Finder is identical to the file storage title. The name of the disk image may differ if the file storage title contains any symbols not allowed in file names.
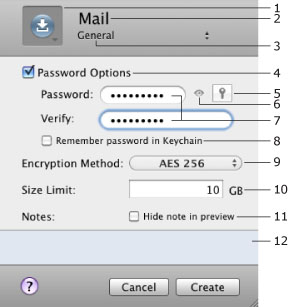
1 – The icon that appears on the card in the main window. To choose another icon, here and choose one in the list.
2 – The account name. You can see it in the main window.
3 – Here you can specify the category your storage belongs to in order to organize cards in the main window.
4 – Select this check box if you wish to specify a password.
5 – Open the Password Assistant to generate a secure password.
6 – Hide or display the password.
7 – Type your password in both fields.
8 – Select this check box if you wish to store your password in the Keychain.
9 – Select the encryption method.
10 – Set up the maximum size of the file storage.
11 – Select this check box to prevent displaying your notes (12) in the main window.
12 – Type your notes here.
To create a file storage:
A quick way to create a new file storage is to drag and drop a file from the Finder to the empty space in the main window of Concealer.
A quick way to add a file to an existing file storage is to drag and drop this file onto the icon of the storage.
The size of the file storage is variable. It can increase when you add new files in it. It is limited by the Size Limit specified when you created the storage.
To open a file storage, double-click on it in the main window.
To change the password of a file storage, right-click on it and choose Change Password...
To change the properties of a file storage, right-click on it and select Properties... You can edit the title or note, and specify whether to save the password in the Keychain. Also here is an option to show or hide the note on the file storage icon in the main window.
You can create a file storage without specifying a password. In this case, the master password will be used.
Each file storage exists physically as a disk image. Since anyone can access them in the Finder and bypass Concealer, all file storages are encrypted individually.
When a disk image that correlates to a file storage is mounted, the information in it remains unprotected. If you are not using it, unmount the disk image manually, or right-click on the file storage in the main window and choose Lock File Storage. The program preferences let you set up the inactivity period after which the program is locked. To lock all file storages too, select the Lock File Storages when program is locked check box.
To remove a file storage, right-click on it and choose Move to Trash. To delete it permanently, empty the Trash.