Swift Publisher: Migrating to Swift Publisher 5
Moving “My Templates” from Version 4 to Version 5
Swift Publisher 5 automatically detects custom templates (“My Templates” in the Template Gallery) created in the previous version and copies them to the new version’s Template Gallery. However, this is only true if both versions were bought from the same store (e.g. both Swift Publisher 4 and 5 were bought from BeLight Software’s web site, or both were bought from the Mac App Store).
If you purchased Swift Publisher 4 from the Mac App Store and upgraded to Swift Publisher 5 from BeLight Software’s web site, you need to transfer the templates manually.
Follow these steps:
- Switch to Finder, choose Go > Go to Folder… from the menu.
- Enter the following command into the command line: ~/Library/Group Containers/7TJZ7EZWM6.com.belightsoft.PrintProducts/Library/Application Support/Swift Publisher 4.
- In the window that opens, select the My Templates folder and copy it to your Desktop or another location of your choice.
- Again, choose Go > Go to Folder… from the Finder’s menu.
- Enter the following command into the command line: ~/Library/Application Support/Swift Publisher 5.
- Place the My Templates folder you had copies in Step 3 into the window that opens.
Moving your iCloud Drive documents from Version 4 to Version 5
- Switch to Finder, choose Go > iCloud Drive… from the menu.
- In the window that opens you will see the folders named Swift Publisher 4 and Swift Publisher 5.
- Copy the files from the Swift Publisher 4 folder into the Swift Publisher 5 folder.
Enabling Additional Clipart from Version 4 in Version 5
If you purchased the Extras Pack directly from BeLight Software, it will be available in all BeLight products, regardless of their version or origin (BeLight or Mac App Store).
If you purchased Additional Clipart in Swift Publisher 4 as an in-app purchase, it will be accessible by Swift Publisher 5 purchased from the Mac App Store. However, clipart purchased as in-app purchase won’t be visible in a non-Mac App Store version of Swift Publisher.
If you purchased Additional Clipart as in-app purchase and need to use it in Swift Publisher 5, do one of the following:
- Contact our Sales Team (sales@belightsoft.com) with a proof of your purchase and ask them to provide you with a link to download Additional Clipart free of charge.
or move the clipart folder to another location:
- Switch to Finder, choose Go > Go to Folder… from the menu.
- Enter the following command into the command line:
~/Library/Group Containers/7TJZ7EZWM6.com.belightsoft.PrintProducts/Library/Application Support/ - In the window that opens, select the BeLight Software folder and copy it into the Clipboard (press Cmd+C).
- Back in the Finder, choose Go > Computer from the menu.
- Double-click on the system disk (normally called Macintosh HD), open the Library folder and then the Application Support folder.
- Press Cmd+V to paste the BeLight Software folder you have previously copied. You will be asked to enter your Administrator password at this step.
- Restart Swift Publisher.
Removing Swift Publisher 4 from your computer
To completely remove Swift Publisher 4 and its supporting files from your computer, follow the steps below.
Mac App Store version:
- Remove Swift Publisher 4 from the Applications folder.
- In Finder, choose Go > Go to Folder… from the menu and enter this path: ~/Library/Containers/
- Delete the com.belightsoft.SwiftPublisher4 folder.
BeLight Software version:
- Remove Swift Publisher 4 from the Applications folder.
- In Finder, choose Go > Go to Folder… from the menu and enter this path: ~/Library/Application Support/
- Delete the com.belightsoft.SwiftPublisher4 folder.
- Delete the Swift Publisher 4 folder.
Labels & Addresses: Importing from Excel 2016
Presently, Labels & Addresses does not support importing from Excel 2016 directly (earlier versions work fine). There are two possible workarounds until the problem is solved.
Importing through Apple Numbers
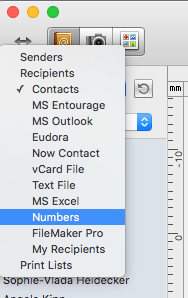
If you have Apple Numbers on your computer, you can import Excel documents into Labels & Addresses by choosing "Numbers" in the list of import sources in the Source panel of Labels & Addresses.
In the File dialog choose the Excel file you’d like to open. A dialog will open offering you to map data from the Excel file to the fields in your Labels & Addresses document.
Importing from a Text File
If you don’t have Apple Numbers, you may first export your Excel document to a text file and then import it into Labels & Addresses. Open the document in MS Excel and choose "File > Save As…". In the list of file formats choose "Tab Delimited" or "Comma-Separated" format and save your file.
In Labels & Addresses, choose "Text File" in the list of import sources in the Source panel. In the File dialog choose the text file previously exported from Excel. A dialog will open allowing you to map data from the text file to the fields in your Labels & Addresses document. Make sure you specify the delimiter correctly — if you saved your text file as tab delimited, choose "Tab" for delimiter. If you saved your file as comma-separated, choose "Comma".
Disc Cover: Direct-to-Disc Printing with Canon AirPrint-enabled Printers
Some owners of Canon printers reported being unable to set the output to the disc tray. The printer would always output to a paper tray, and if the disc tray had been inserted before beginning the print operation, a 'Cover is open' error would appear.
Though the solution below was tested with MX-920 series printers, it might work for other Canon’s AirPrint printers as well.
There are actually two drivers that come with those printers: one that uses AirPrint (based on Apple's Bonjour service), and another, more conventional OS X driver. By default, only the AirPrint driver appears in System Preferences > Printers & Scanners, and it doesn't support disc printing.
To get to the second driver, you will have to add it to the list of printers in Printers & Scanners, even though it had been installed with the AirPrint driver. Click the '+' sign at the bottom of the list to open the 'Add' page.
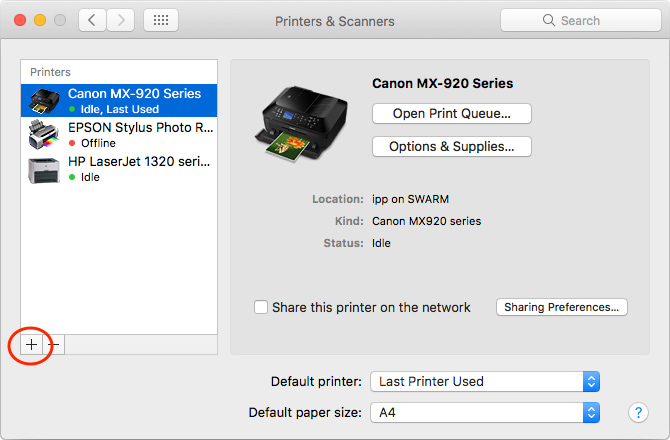
Initially, only one driver will appear on that page, 'Canon MX920 series', and its 'Kind' will be listed as 'Bonjour'. That's the AirPrint driver. But if you wait a few seconds, a second driver will appear with the exact same name, but its 'Kind' will be listed as 'Canon IJ Network’. That’s the more conventional OS X driver, and it's the only one that recognizes direct-to-disc printing. Select it and click the ‘Add’ button to add the driver to the list of printers.
Unfortunately, the AirPrint driver is the only one that will let you specify which paper tray to feed from, so don't delete it from your Mac. Instead, you might rename both drivers in the main Printers & Scanners page, by right-clicking each one and selecting ‘Rename printer’.
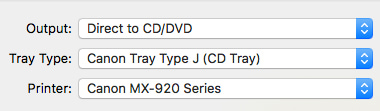
Now, back to the Disc Cover print dialog. On the first page of the print dialog you specify direct-to-disc printing, with three drop-downs labelled ‘Output’, with a ‘Direct to CD/DVD’ option, ’Tray Type’ with a ‘Canon Tray Type J (CD Tray)’ option; and ‘Printer’, which should default to the IJ Network driver.
Click the ’Next’ button on the first page of the print driver, and an instructions page will appear in a separate window. Dismiss the instructions window if it appears, and the second page of the print dialog — which is the actual OS X print dialog — will pop up.
Click the ’Show Details’ button at the bottom of the page, and a number of additional options appear. About halfway down the expanded page, click the ‘Layout’ drop-down and select ‘Quality & Media’.
The options below the drop-down will change. The first option is a drop-down labelled ‘Media Type’. In this drop-down, select ‘Other Papers’ > ‘Printable disc’. The second drop-down, ‘Paper Source’, should change to ‘Disc tray’. Now you are ready to print, but don't insert the disc printing tray into the printer yet. There is no need to calibrate the printer; it manages its own calibration when printing to disc.

Instead, click the ‘Print’ button and wait. A window will pop up on your Mac, telling you not to insert the disc tray (which is clipped to the underside of the top paper tray) until a notification on the printer's front panel asks you to do so.
When the printer prompts you to do so, open an inner door on the printer and carefully slide the tray into a slot behind the inner door, lining up a white triangular arrow on the tray with a corresponding arrow on the opened door. Then, hit the ‘OK’ button on the printer, and it will take over and complete the print job.
Disc Cover: Using LightScribe on a Mac
For macOS 10.10 and Below
You need to download and install the LightScribe Driver to use your LightScribe device with your Mac.
Download LightScribe Driver.
For macOS El Capitan and Sierra
HP discontinued support for LightScribe in 2013. So, the latest driver is not compatible with macOS El Capitan or later. Here is a solution that can help users of El Capitan and Sierra to use their Lightscribe devices.
- Download Lightscribe System Software and extract the .tar file:
https://lightscribesoftware.org/freesoftware/mac/ - Download Pacifist software:
https://www.charlessoft.com - Follow these instructions:
https://lightscribesoftware.org/how-to-install-system-software-on-el-capitan/
Disclaimer
The above method was tested and proved to be a valid one, nevertheless BeLight Software accepts no responsibility and you are doing this at your own risk. BeLight Software makes no warranty that the above method will work on all Mac computers. BeLight Software has no affiliation with Pacifist software and takes no responsibility for its performance.