Working with Objects
Walls are the basis of your project. Usually you begin creating a floor plan by drawing external walls and then the internal walls.
Walls can be of two types: Story Walls (general type of walls) and Loft Walls. Most of the information here is applicable to both wall types. If something concerns only Loft Walls, it is specified.
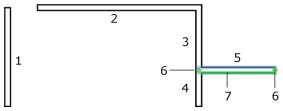
A wall segment is a piece of a wall that is limited by two end points. When a segment is selected, its end points (ends) are marked with green handles (6).
If you draw a wall segment that crosses another one, both segments will split into two smaller segments. If a segment joins another one in the middle, the latter will split into two smaller segments.
The program can join two segments of a straight wall into one when you remove the wall that crosses and splits it.
1-5 – Wall segments.
3 and 4 – These are parts of a single segment that has been divided into two parts by the joining the segment (5).
6 – Handles of segment (5).
7 – The selected side of the wall segment (5) is highlighted green.
The word “wall” is used in this documentation both for a single wall segment and for a wall consisting of multiple wall segments.
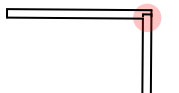
When you are creating a room, wall segments should join (like segments 2 and 3, or like 3, 4 and 5) to form a closed shape. The joint may break when you resize, move or add wall segments. Places where segments are joined incorrectly are marked by red circles on the floor plan. You should move a segment aside and then return it back to restore the connection. If this doesn't help, delete the affected segments and draw it again.
To add walls, you can use either the Wall or Room tool.
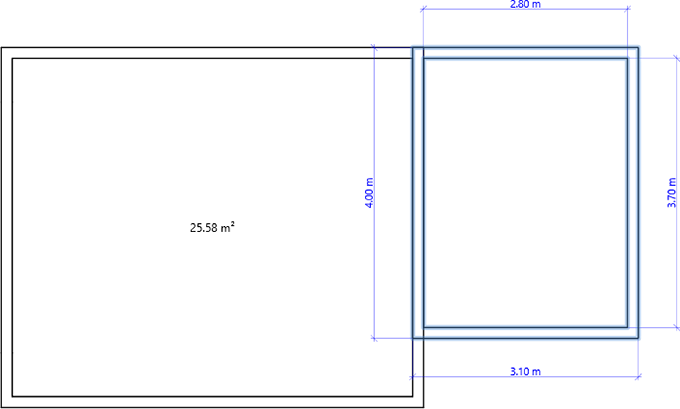
The Room tool creates a rectangular room. It adds four wall segments at once. To draw a room, activate the tool. Then tap on the floor plan and drag. Take your finger off the screen when you reach the desired room size.

When you draw an adjoining room, make one of its walls overlap with a wall of another room exactly. The program will automatically create a single partitioning wall at the overlapping area.
The Wall tool lets you add both individual wall segments and multi-segment walls.

To add a single wall segment with the Wall tool, tap and drag, and then remove your finger off the screen. While your finger is still placed on the screen, you can change the angle and length of the wall.
In more complicated projects, you may need to add a series of wall segments. This is easier to do with the mouse rather than using the touch screen. To add several segments linked one to another, click on the floor plan several times. Each click will specify the end of one segment and beginning of the following. To finish, double-click where the end of the last segment should appear.
When you draw walls, the tool snaps to certain angles and to ends of other walls. You can switch this on or off in the program settings.
To remove a wall, activate the Select tool, bring up the context menu for this wall, and choose the Delete command. Or, use the Undo button if adding a wall was your last action.
To select a single wall segment, tap on it with the Select tool activated.
The Select tool can also select the whole room if you tap on a wall belonging to this room. To select only the wall, tap on it again.
To select several segments, draw a selection frame using the Select tool.
The Project Tree lets you set the Visibility and Lock options. Locking walls can effectively protect your building from unintentional changes when you are working with furniture or setting up the lighting. Making a wall temporarily invisible lets you take a screenshot of the 3D view from a greater distance to include more objects.
You can move a wall segment by dragging its middle part or its end handles. The first way doesn't change the configuration of the segment you drag. Moving around one segment end changes its direction and length. The other end retains its position.
When you move a segment with one or two ends joining other segments, the program will change the length of these segments to keep the walls joined. To move walls without changing their sizes and angles, you should select and move all the joined segments together.
Let's use the term "room" to call a closed shape created with walls. A simplest room has four walls linked one to another.
To select a room, tap on one of its walls. You can also select a room using the selection frame.
The program can work with a room as with a solid object when the whole room is selected. In this mode, if you drag a corner or wall, the room changes its shape keeping all walls connected to each other. Additionally, when you drag a corner handle, the walls don't change their angles. Contrary, if only one wall is selected, moving its end will change the angle of this wall and the adjoining wall.
To move a room, select it and drag aside. You should grab the area taken by the floor, not by the walls.
Most of the wall parameters can be modified in the Object Properties tab of the Inspector.
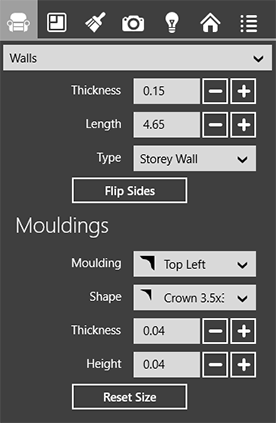
To change the length of a wall, select it and drag one of its handles. You can also set the exact length in the Inspector.
All Story Walls on each floor have the same height which is equal to the story height specified in the the Building tab of the Inspector. The height of Loft Walls is variable. It is defined by the height of the roof. If there is no roof above a Loft Wall, its height is limited by the story height.
The wall crown and base can be set up in the Mouldings section of the Inspector. You can change their size and shape. If a wall has no crown or base, select the “–” item. Before adjusting the Shape, Thickness and Hight parameters, select the proper wall side (left or right) in the Moulding drop-down list.
The Flip Sides button swaps the materials, wall crowns and bases on the opposite sides of the wall.
To apply a new material to a wall, drag and drop this material from the Palette directly onto the wall in the 3D view. If you cannot do this precisely, or the part of the wall you need to change is not visible, select the entire wall to display its materials in the Object Materials tab of the Inspector. Then drop the new material onto the old one in the Inspector.
The end surfaces (butt-ends) of walls do not have independent materials, they use the same material as one of the wall sides.
To differentiate walls on the floor plan according to the applied materials or other criteria, apply different stroke colors and pattern fills to them. These parameters can be changed in the 2D Properties tab of the Inspector.