| www.belightsoft.com/liveinterior | Start of Help | Index > Working with Projects |
The Project Tree is a list of objects that have been added to the current project. To open it, choose Window > Project Tree.
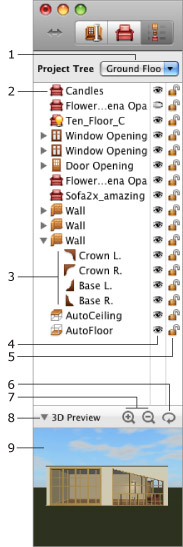
1 – The floor selector. You can choose to display objects located on one floor or on all the floors.
2 – An object. Clicking an item in the list, you will select the object in the list and in 3D and 3D views.
3 – Sub-items of an object. Click on the triangle to show or hide an object's sub-items.
4 – The Visibility option. Click on the icon to hide or show an object in the project.
5 – The Lock option. Click on the icon to prevent occasional changing or moving of an object.
6 – Turn on/off the preview animation mode.
7 – Zoom in or zoom out the preview.
8 – Show or hide the preview box.
9 – The preview box displays the preview of the object selected in the Project Tree. If a camera or movie camera is selected, you can see here the view produced by this camera.
Objects get a default name when you add them to the project. For example, all wall segments are named “Wall”. If you need to distinguish objects of the same type, assign different names to them. To change the name, double-click on it in the Project Tree.
The objects are grouped by type.
The Project Tree can display items on a selected floor or all items in the project. When all floors are displayed in the Project Tree, floors and slabs are at the top. Walls, windows, furniture, etc. are sub-items of the corresponding floors.
When you select an object in the 2D or 3D view, it gets selected in the Project Tree, and vice versa.
If you need to select all objects of the same type, it is easier to do this in the Project Tree.
In the Project Tree, the objects have two controls:
A locked object cannot be selected by clicking on it in the 2D or 3D view.
These settings can be modified for several objects by a single click when those objects are selected in the list (multiple selection is possible).
Some objects may contain their parts shown in the list as sub-objects. For instance, a door object has a door frame and a door itself. Their parameters may be changed separately. A wall object contains crowns and bases on both sides.
To bring up the context menu, right-click on an object. Most commands are the same as in the context menu in the 2D view. In addition to those, you will find View In 3D. Use this command to find objects in the 3D view.