| www.belightsoft.com/liveinterior | Start of Help | Index > Working with Objects |
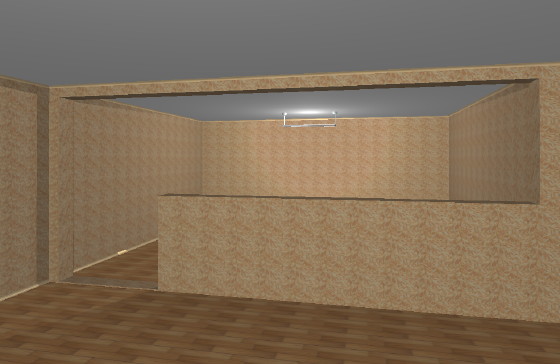
This editor helps you create or modify the shape of an opening, niche or wall panel (all of them are called “objects” in this section). Standard niches and openings are located in the built-in library of 3D models (Window > Library > Building Elements). The editor allows you to work with objects of non-standard shape and size (as the L-shaped opening in the picture).
The same tools are used to create panels, openings and niches for roofs.
Details about openings can be found in Windows, Doors and Openings.
To open the editor, select a wall and choose Edit > Wall Panels, Openings & Niches. Or right-click (Ctrl-click) on a wall and choose Edit Wall Panels, Openings & Niches in the context menu.
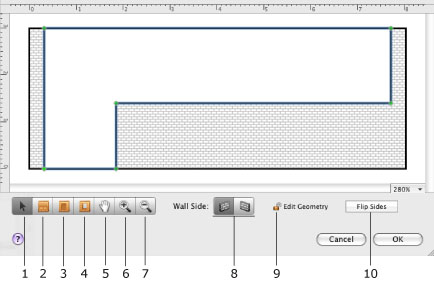
1 – Selection tool. Use it to select objects and to move the corner handles of objects.
2 – Wall Panel tool. Use it to draw the outline of a new wall panel.
3 – Niche tool. Use it to draw the outline of a new niche.
4 – Opening tool. Use it to draw the outline of a new opening.
5 – Pan tool for scrolling the preview area. Choose the tool and drag the preview.
6 – Zoom in.
7 – Zoom out.
8 – Wall side selector.
9 – Lock option. Lock an object to prevent changing its shape. Changing the location remains possible.
10 – Flip an opening, or put a wall panel or niche onto another wall side.
Objects look in different way in the editor depending on their type (2, 3 and 4 in the picture below).
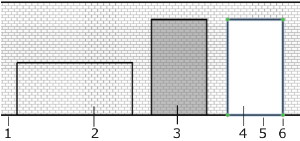
In the editing area:
1 – Wall outline.
2 – Wall panel.
3 – Niche.
4 – Opening.
5 – A selected object is highlighted.
6 – Corner handles. Move them to change the object shape or size. To add a new handle, Ctrl-click on an object's side and choose Add Contour Point in the pop-up menu. To delete a handle, Ctrl-click on it and choose Delete Contour Point in the context menu.
To move an object, drag it with the mouse.