| www.belightsoft.com/liveinterior | Start of Help | Index > Working with Objects |
The program automatically adds a floor and ceiling when you have drawn a closed shape with walls. So, usually you do not need to add ceilings and floors manually.
Automatically added floors and ceilings have the default names “AutoFloor” and “AutoCeiling” in the Project Tree.
In contrast to manually added floors and ceilings, automatic floors and ceilings:
The “AutoFloor” and “AutoCeiling” cannot be deleted.
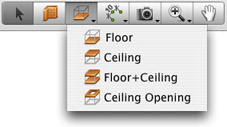
To add a floor or a ceiling manually, select the corresponding tool in the 2D toolbar. Then click in your layout several times to add corners. And finally, double-click to add the last corner and exit the floor/ceiling drawing mode. Floors and ceilings can be added together.
To remove a floor or a ceiling, select it and press the Delete key.
To select a ceiling or a floor in the 2D layout, you should click its outline. Sometimes it is difficult because the outline goes over walls (walls have higher priority for selection). Since all ceilings and floors are listed in the Project Tree, you can select them in the list.
The Project Tree lets you control the Visibility and Lock options.
To move a ceiling or a floor, select it and drag its edge with the mouse.
Note: When you move ceilings or floors, they turn to regular (non-automatic) objects: they will not change their shape when you modify walls.
To resize a ceiling or a floor, select it and drag a corner handle with the mouse.
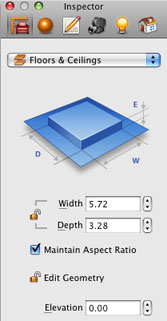
The Information bar shows the dimensions of the selected ceiling or floor. If the object is rectangular, and its sides are vertical and horizontal, the dimensions will mean width and height. To show or hide the Information bar and rulers, press Cmd-R.
To change the shape of the ceiling or the floor, you can add or delete its corner handles. To add a handle, right-click on the floor or ceiling outline and select Add Contour Point in the context menu. To delete a handle, right-click on it and select Delete Contour Point.
To lock or unlock the shape of custom floors or ceilings, click on the Edit Geometry icon in the Inspector.
Rooms located on the same storey may have different floor or ceiling levels. To recreate this in the program, you have to add a custom floor or ceiling and set its elevation different than that of the "AutoFloor" or "AutoCeiling".
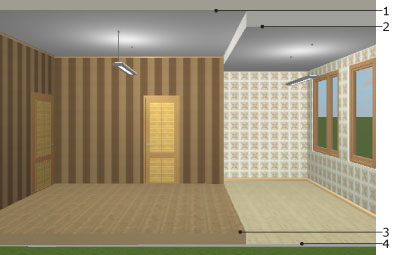
1 – The "AutoCeiling" which has the default level.
2 – A custom ceiling that the Elevation lower than "AutoCeiling".
3 – A custom floor with the Elevation higher than the "AutoFloor".
4 – The "AutoFloor" that has the default level.
To change the floor and ceiling levels, select it in 2D and change the Elevation value in the Object Properties tab of the Inspector.
Use the Materials tab of the Inspector to apply or change a material. See Applying Materials for more detail.
To make objects look differently in the 2D view depending on the material, size or other principle, apply different stroke colors and pattern fills. They can be changed in the 2D Properties tab in the Inspector.
Unlike the ceiling, the floor has a text label. By default, the label is displayed on the area of the floor. To add your own text, double click the label.
The location of the label in the 2D layout can be changed. To do this, drag the label to a new location.
If a custom floor is placed over the “AutoFloor”, the area of the “AutoFloor” decreases by the area of the custom floor.