| www.belightsoft.com/liveinterior | Start of Help | Index > Working with Materials |
The material library is located in the Materials tab of the Inspector. It lets you:
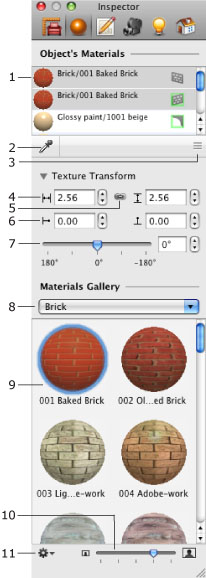
1 – The list of all materials of the selected object(s). Each item here represents a part of the object.
The same material may appear in the list several times. This means that it has been applied to several parts of the object. Actions possible with the materials listed here are described in Working with the List of Object Materials.
2 – Material picker. It allows you to choose
a material of one object and apply it to
another. Use it to make objects match.
3 – A handle to expand or collapse the list (1).
4 – Texture size (horizontal and vertical). See Adjusting the Texture Size and Orientation for more details.
5 – Maintain aspect ratio.
6 – Texture offset parameters allow you to change the positioning of the texture on the object's surface.
7 – Texture rotation control.
8 – Material category selector (it allows you to add and remove custom categories).
9 – Thumbnails of materials.
10 – Thumbnail size control.
11 – Actions menu:
Method 1:
In the 3D view, drag a material from the library (9) or from the Object's Materials list (1) and drop it onto an object. Be careful, as an object may have multiple parts. Point to the exact part of the object you want to modify.
Method 2:
To change the material:
To copy a material from another object, use the material picker (2).
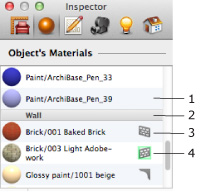
1 – One of the object's materials.
2 – The name of the object whose materials are listed below.
3 – Material on a side of a wall. The icon to the right indicates which part of the wall this material belongs to.
4 – Material of the selected wall side (indicated by green highlight).
Materials used for walls have an additional icon (3 and 4) that indicates which part of the wall this material belongs to. An icon with a green highlight indicates that this side is currently selected.
To apply the material of one part of an object to another, drag and drop it. For example, to apply the brick material in the above illustration to both wall sides, grab the material (3) and drop it onto the other (4).
Clicking on a material while holding Option selects all identical materials. Alternatively, you can right-click on a material and choose Select in the List. This way you can update materials universally in a few clicks. For instance, replace all fabric parts of multiple furniture objects with a different material.
To locate an object's material inside the library, double-click on it or right-click on this material and select Reveal in Library. Note that some objects in the library have materials that aren't present in the library. As a rule, these objects are provided by furniture manufacturers and its logo is displayed in the library preview.
When you drag and drop a material onto another in the Object's Materials list, you update not only the material but also its transformation settings.
Use the Texture Transform settings to adjust the texture size and orientation of materials applied to an object. This function is available for walls, ceilings, floors, wall panels, openings and niches if a material with a texture has been used. You can also adjust the texture of roofs and dormers.
The Texture Transform settings are useful for making a texture meet a wall edge or corner.
The Texture Transform settings in the Inspector differ from the Rotate and Scale parameters in the Material Editor. See the table for details.
Texture Transform |
Material Editor |
| Works with materials applied to a limited number of object types. | Works with all materials that have the texture. |
| Changes only the selected object. | Changes all the objects to which the edited material was applied. |
| Rotates a texture by any angle. | Rotates a texture by 90, 180 and 270 degrees. |
| Resizes a texture with any side proportion. | Resizes a texture proportionally. |
| Sets up the physical texture tile size (in meters, inches, etc.) | Sets up relative texture tile size. |
| Live preview in the 3D view. | Texture preview on a sample object. |
It is recommended that you use the Texture Transform controls if they are supported by the object that you want to modify.