| www.belightsoft.com/liveinterior | Start of Help | Index > Working with Storeys |
The Building Properties tab of the Inspector allows you to perform the following operations on storeys:
Live Interior 3D Standard lets you create projects with only one or two floors. For more floors, use the Live Interior 3D Pro edition.
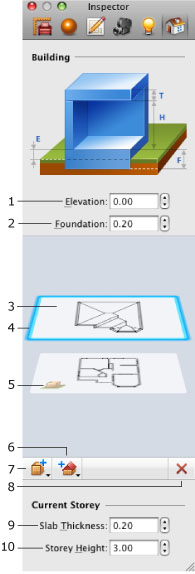
1 – The elevation of the ground floor. Increasing this parameter elevates the whole building.
2 – The thickness of the foundation. If your building doesn't have the basement, the Foundation parameter must be equal or greater than Elevation.
3 – The thumbnail of a floor.
4 – The thumbnail of the current floor has a blue frame. To select other floor, click on its thumbnail. The 2D view displays the floor plan of the selected floor.
5 – This icon identifies the ground floor. To change the ground floor, select another floor, and choose "Mark Storey as Ground" in the pop-up menu of button (7).
6 – Add a roof. By click on this button you add a roof above the current floor. If you click and hold the mouse button, the pop-up menu will open. This menu gives a choice to add a roof in the current floor or above it.
7 – Add a floor. By click on this button you add a floor above the current one. If you click and hold the mouse button, the pop-up menu will open. This menu gives a choice to add a floor above or below the current one, or to choose the selected floor as the ground floor.
8 – Delete the selected floor.
9 – The slab thickness. Select a floor to change its slab thickness.
10 – The storey height. Select a floor to change its height.
To add a storey above the current one, click the button (7).
To add a storey below the current one, click and hold the button (7) until the pop-up menu is displayed. Choose Add Storey Below Current.
When you add a new storey, it becomes active automatically (its floor plan is displayed in the 2D view). The outer walls, floor and ceiling of the previously selected storey are being copied onto the new floor.
To remove the active storey, click the Delete Current Storey button (8) in the Inspector.
All the objects located on the removed storey will be removed too.
If you remove the ground floor, another floor automatically becomes the ground floor.
The active (current) storey is the one whose floor plan is displayed in the 2D view. The active storey name is displayed at the bottom of 2D view. In the Inspector, the thumbnail of the active storey is highlighted.
To make another storey active, click on its thumbnail.
A new project has one floor by default. This floor is the ground floor. After adding more floors, you can choose any floor to be the ground floor. To do this, make that storey active. Click and hold the button (7) until the pop-up menu is displayed. Choose Mark Storey as Ground.
Use edit box or steppers (9) to change the slab height of the active storey.
Use edit box or steppers (10) to change the height of the active storey.