Adding and Deleting Roofs
The Roofing Assistant
The Roofing Assistant helps you add a standard roof to your building.
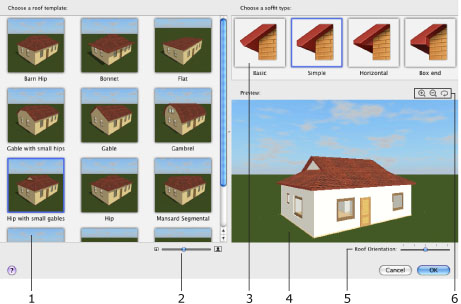
1 – Roofing templates.
2 – Magnification slider.
3 – Soffit type. You can also change it in the Object Properties tab of the Inspector.
4 – Preview of your project with the added roof. You can rotate the picture with the mouse.
5 – Roof orientation. You can turn the roof in 90 degree increments.
6 – Zoom and live rotation controls for the preview.
Adding a Roof
To add a roof together with a new storey:
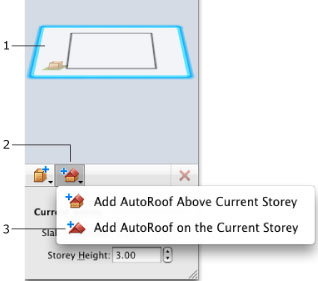
- Select the upper storey of your building (1) in the Building Properties tab of the Inspector.
- Click button (2) in the Inspector to open the Roofing Assistant.
The following steps are to be made in the Roofing Assistant described above.
- Click on a roofing thumbnail (1) to select the roofing type.
- Set up the Roof Orientation (5).
- Choose the type of the soffit (3).
- Click the OK button.
To add a roof in the current storey:
- Select a storey (1) in the Building Properties tab of the Inspector.
- In the Inspector, click button (2) and hold it to have the pop-up menu open.
- Choose Add AutoRoof on the Current Storey (3) to open the Roofing Assistant.
The following steps are to be made in the Roofing Assistant described above.
- Click on a roofing thumbnail (1) to select the roofing type.
- Set up the Roof Orientation (5).
- Choose the type of the soffit (3).
- Click the OK button.
Once a roof is added, you can change its properties using the Inspector.
After a roof has been added, the corresponding button in the Inspector changes its function from adding to removing.
Deleting a Roof
To delete a roof:
- In the Building Properties tab of the Inspector, select the storey where the roof is located.
- Choose Edit > Building > Remove AutoRoof from the Current Storey.
To delete a roof together with the storey, in the Building Properties tab of the Inspector:
- Select the storey.
- Click the Delete Current Storey button.