| www.belightsoft.com/liveinterior | Start of Help | Index > Working with Objects |
Windows, doors and openings have a similar behavior in the program, so the term “opening” will be used for all these objects except we need to describe the difference between them.
To add an opening:
When you bring an opening over the 2D layout, the opening snaps to walls and changes its orientation according to the orientation of the closest wall.
To remove an opening, select it and press the Delete or Backspace key.
To select an opening, click on it.
All the openings used in the layout are listed in the Project Tree. You can select them in the list.
To move an opening, drag it with the mouse. Another way is to use the arrow keys when the opening is selected.
When you move the opening near a wall, it will be inserted into the wall automatically. To rip the opening out, drag it out of the wall.
The Information bar shows the opening height, width, thickness, elevation and angle. The bar is located above the horizontal ruler. To show or hide the Information bar and rulers, press Cmd-R.
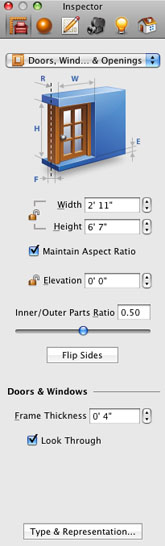
Most of an opening's parameters can be modified in the Inspector window.
The Flip Sides button turns the opening 180 degrees.
In the Inspector window, you can control the elevation of openings.
The Elevation parameter can be locked/unlocked by clicking the lock icon. Locking the elevation is useful when you need to move an object only horizontally in the 3D view (for example, to distribute windows in the wall).
The Project Tree lets you control the Visibility and Lock options.
The Look Through check box should be selected if a door or window has transparent parts. In this case, objects in the room behind the door or window are displayed correctly in the 3D view. Deselecting the check box turns off rendering objects behind the door or window. This speeds up rendering the 3D picture.
To change an object's properties such as the orientation in 3D, the origin point and 2D representation, select the object and click the Type & Representation button in the Inspector. The program will open the Type & Representation dialog.
To change the dimensions of an opening, use the Object Properties tab of the Inspector window. You can adjust the height, width, thickness, elevation and frame thickness.
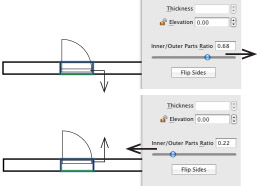
The Inner/Outer Parts Ratio slider sets the position of an opening in relation to the wall (how deep it is in the doorway).
Use the Materials tab of the Inspector to apply or change a material. See Applying Materials for more detail.
You may want to make openings look differently in the 2D view depending on the material they are made of. To do this, use the 2D Properties tab of the Inspector window.
You can use the settings from the Drawing section to change the outline color and fill color for the opening, as well as apply fill patterns.